I made my first banner for Samantha's birthday almost four years ago now (wow!). I was inspired by the one in Alicia Paulson's book Stitched in Time. I used freezer paper to stencil the letters to personalize it and have enjoyed using it every year. But hers is pink and girly, and I would have to find a new fabric to add B&E's names, so I just decided to make them their own.
Supplies:
One charm pack of fabrics you like or enough 5" squares to spell out your desired message.
Freezer paper (I get mine at the grocery store)
Scissors or a fine, small tipped 'box cutter' razor (has a handle)
Pencil for tracing
Printer and computer
Two packages of bias tape (or only one if you're not adding a name), or homemade bias tape
Pinking shears
Ruler or straight edge
Sewing Machine and matching thread
Fabric paint and paintbrush
Iron
First you need to decide what letters you will need. If you're making a birthday banner, you'll need h, a, p, y, b, i, r, t, d and the letters for the name you'd like.
Chose a font you like that is big and bold, and print your letters at your desired size (hold them over your fabric to make sure they are not too big if you're worried!).
Then begins the tracing process. You want to trace each letter onto freezer paper. Trace onto the 'paper' side - not the slick side - the slick side is the side that fuses to the fabric when you iron it down. I find a nice mechanical pencil makes a good tool for this. Allow enough room around each letter for adhering to the fabric, and make sure you trace as many copies of each letter that you'll need (you can only use each stencil once - so you'll need to trace p twice, y twice, h twice, a twice, etc).
Then starts the fun of cutting! I use a small box cutter-type handheld razor sometimes, but for large areas I use small tipped scissors, as I don't have to worry about having something underneath to protect my surface like I do with the razor. Go slowly!
For letters that have an 'inside,' make sure you save those pieces (b, d, p, o, a, e, g, q)
Then lay out your fabric in a color pattern you find pleasing. Make sure to allow spaces between the words (a blank square), and at the beginning and end if desired.
Iron each letter to the horizontal center of a square (I just eyeball mine), and put them a bit below center vertically (to allow room for the bias tape at the top).
Iron them on! Make sure you keep them in your color pattern, if it is important to you. When ironing on those letters that have an 'inside', make sure you iron down the inside part of the letter (see d above and b and e below).
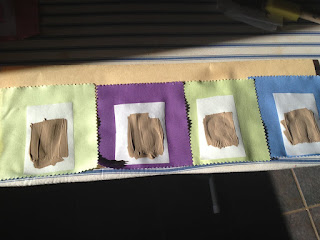
Pour your paint into a container and get your brush. Using light, even strokes, cover the letter.
(I laid out my letters on construction paper. This made it easy to move them around in groups and to keep them in order. It also kept paint off my ironing board!)
Add layers of paint until they have the coverage you desire (I don't wait for them to dry, but you can.)
Allow them to dry - I waited about 24 hours. Then carefully peel away the freezer paper. (Don't forget the insides of those letters that have them!) Keep them in order!
If you want to trim your letters into a shape, now is the time. For my first banner I cut them into a curved edge, but I wanted a pointy banner this time.
I folded the squares in half and measured up from the bottom point.
I traced a line so I would know where to cut.
Then I used my pinking shears to cut on the line (I used pinking shears because the charm squares were already pinked and because pinked edges are less likely to fray).
Open 'em up and voila!
Lay out your words and find the center point. Fold your bias tape in half and find the center. Match them up and slide your letters into the open side of the bias tape. Slowly sew them together from the center point out, inserting the next letter as you come to it. When you are out of letters, sew closed the rest of the bias tape. Turn your tape around and sew the rest of the letters out from the center, and sew the rest of the bias tape closed.
If you have a name, repeat this step.
(I apologize for not having pictures of this part - I totally forgot!)
Now hang, admire and enjoy! Let me know if you have questions!


No comments:
Post a Comment