Monday, November 26, 2012

Modern Half-Square Triangle Quilt-a-Long Block 12

Welcome! If you are just joining us, information about materials can be found here, and here are the previous blocks: Block 1Block 2Block 3Block 4Block 5Block 6Block 7Block 8Block 9Block 10Block 11.


Materials:
8 3.5" squares of Color A
8 3.5" squares of Color B

*note* these are the essential materials for each block, so you can cut several blocks worth of fabric at once to save time!

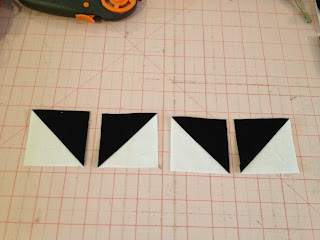
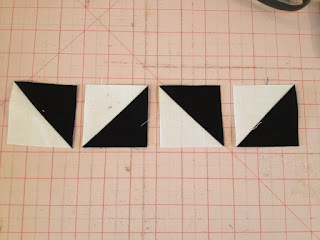
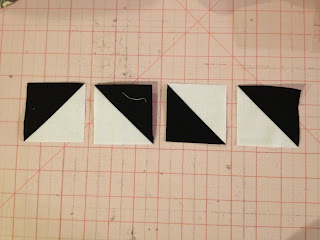
Create your blocks, following the same procedure as last week. If you need help making your blocks, please see this post. You should end up with 16 2.5" squares. Ready to lay out your block? Here we go!


ROW 1


ROW 2


ROW 3


ROW 4

After you have sewn your squares into rows, press your seams. I like to press odd numbered rows to the left, and even to the right. It helps to use a small piece of paper to number your rows. I like the tiny post-it notes. 

After pressing, you are ready to sew your rows together! Pin, if necessary, but I find that these short rows don't require pinning. 


Press one final time, and voila! Another finished block! Only 60 to go! Pat yourself on the back! Remember to add your blocks to our flickr group!


Monday, November 19, 2012

Modern Half-Square Triangle Quilt-a-Long Block 11

**UPDATE** I had added block 12's finished picture, but had the rows for 11 - so if your block didn't look like the original post block 11 you did it right! So sorry - we are away from home for the Thanksgiving holiday and I made two blocks before we left - I wasn't paying close attention after a 2 1/2 day drive when I wrote my post. My apologies! I've corrected the pictures now!

Welcome! If you are just joining us, information about materials can be found here, and here are the previous blocks: Block 1Block 2Block 3Block 4Block 5Block 6Block 7Block 8Block 9Block 10.


Materials:
8 3.5" squares of Color A
8 3.5" squares of Color B

*note* these are the essential materials for each block, so you can cut several blocks worth of fabric at once to save time!

Create your blocks, following the same procedure as last week. If you need help making your blocks, please see this post. You should end up with 16 2.5" squares. Ready to lay out your block? Here we go!


ROW 1


ROW 2


ROW 3


ROW 4

After you have sewn your squares into rows, press your seams. I like to press odd numbered rows to the left, and even to the right. It helps to use a small piece of paper to number your rows. I like the tiny post-it notes. 

After pressing, you are ready to sew your rows together! Pin, if necessary, but I find that these short rows don't require pinning. 


Press one final time, and voila! Another finished block! Only 61 to go! Pat yourself on the back! Remember to add your blocks to our flickr group!


Wednesday, November 14, 2012

WIP Wednesday

I managed to get three quilt tops finished this week!

The plus quilt is a commissioned quilt for Samantha's best friend. The Modern maples is just for fun and the green triangles is to be our Christmas tree skirt! I'm excited to get these quilted and finished.

Monday, November 12, 2012

Modern Half-Square Triangle Quilt-a-Long Block 10

Welcome! If you are just joining us, information about materials can be found here, and here are the previous blocks: Block 1Block 2Block 3Block 4Block 5Block 6Block 7Block 8Block 9.


Materials:
8 3.5" squares of Color A
8 3.5" squares of Color B

*note* these are the essential materials for each block, so you can cut several blocks worth of fabric at once to save time!

Create your blocks, following the same procedure as last week. If you need help making your blocks, please see this post. You should end up with 16 2.5" squares. Ready to lay out your block? Here we go!


ROW 1


ROW 2


ROW 3


ROW 4

After you have sewn your squares into rows, press your seams. I like to press odd numbered rows to the left, and even to the right. It helps to use a small piece of paper to number your rows. I like the tiny post-it notes. 

After pressing, you are ready to sew your rows together! Pin, if necessary, but I find that these short rows don't require pinning. 


Press one final time, and voila! Another finished block! Only 62 to go! Pat yourself on the back! Remember to add your blocks to our flickr group!


Friday, November 09, 2012

What I'm working on

I've been immersed in quilts this week-trying to finish up a few and starting some new projects. I finished hand quilting my crosses quilt, and I quilted and bound two others! I started piecing my Modern Maples quilt and pieced the trees for my Christmas tree skirt. I'm hoping to get three quilt tops pieced next week too!

Monday, November 05, 2012

Modern Half-Square Triangle Quilt-a-Long Block 9

Welcome! If you are just joining us, information about materials can be found here, and here are the previous blocks: Block 1Block 2Block 3Block 4Block 5Block 6Block 7Block 8.


Materials:
8 3.5" squares of Color A
8 3.5" squares of Color B

*note* these are the essential materials for each block, so you can cut several blocks worth of fabric at once to save time!

Create your blocks, following the same procedure as last week. If you need help making your blocks, please see this post. You should end up with 16 2.5" squares. Ready to lay out your block? Here we go!


ROW 1


ROW 2


ROW 3


ROW 4

After you have sewn your squares into rows, press your seams. I like to press odd numbered rows to the left, and even to the right. It helps to use a small piece of paper to number your rows. I like the tiny post-it notes. 

After pressing, you are ready to sew your rows together! Pin, if necessary, but I find that these short rows don't require pinning. 


Press one final time, and voila! Another finished block! Only 63 to go! Pat yourself on the back! Remember to add your blocks to our flickr group!


Sunday, November 04, 2012

Sewing Room Organizers

Last summer I picked up the Fall 2011 issue of Stitch magazine. Inside it had some cute patterns, but one I really liked were the sewing room organizers that used embroidery hoops. (I cannot find a link to this free pattern on the Stitch website, but I found there once!) One of my friends was having a birthday this spring and had just gotten a sewing corner and I thought she could use some organization! (Can't we all?)
Sewing room hoops

These came together really quickly, and all out of stash fabric! I made pockets in the smallest one, even though it only calls for one. I would make these again!

Saturday, November 03, 2012

Neighborly

Several months ago I knew I wanted to knit Samantha a cute vest of some sort for layering. So often down here in Texas we don't need winter coats, and we often just wear wool sweaters, but sometimes just a small amount of warmth is needed (of course, as I'm writing this is almost 90 here in November, so obviously not this year!). I had seen this pattern pop up across blogland, and I thought it would be super cute.

neighborly

It knit up pretty quickly and only used one skein of Cascade 220. I left off picking up stitches for the armholes (I like the way it looks with the rolled edge) and I added some length (I still think it's a bit short).

Samantha enjoys wearing it, which means it's a winner!

Friday, November 02, 2012

Christmas Circles Quilt

A few weeks ago, I saw this pin and I knew what I wanted to make for Ellie's Christmas quilt. I had been wanting to use some of Ann Kelle's Jingle line and wanted a design that would show off the relatively large prints. (You can see progress on this quilt here and here).

Christmas Circles Quilt

I finished it up about a week and half ago. I quilted lines 1/4" away from the seams on both sides. Nice and simple to not distract from the circles! I bound it using a blue and white snowflake print that I found in the remnant bin at JoAnn's. I don't have a picture of the backing, but I used a large print that has Christmas lights on it and some scraps to bring it up to size (penguins and wreaths). One of the scraps is actually a vintage print that I inherited somehow. The white background is Kona White.

It turned out pretty cute and every kid who sees it has fun 'finding' all the cute prints on it.

Thursday, November 01, 2012

Halloween costume wrap up

I thought I'd share pictures of our finished costumes!


photo 1

Ben and Ellie were Thing One and Thing Two. I purchased the adorable fabric for their pants last year (always a planner!). For their shirts I found long sleeve red shirts at Walmart (I was pleasantly surprised by the feel of the shirts, and it is impossible to find inexpensive plain solid colored long sleeve shirts for toddlers!) and made iron-on transfers for the 'thing' circles. They didn't turn out great (my iron was too hot I think and the transfer didn't adhere all over. Oh well - they are for a costume!  For their hats I knit a basic hat pattern and held fun fur along with a plain yarn. Of course, I used light blue fun fur from my stash and didn't have enough for two hats and JoAnn's didn't have more light blue, so Ellie's is a different color. Oh well!

photo 3

About halfway through they mostly got the hang of trick-or-treating and would walk up to the houses without holding onto mommy and daddy. They didn't get the 'open up your bag' part, but I'm sure they'll have it down by next year! Everyone thought they were adorable, because, well, they are!

photo 2

Samantha loved her pumpkin costume - I'm glad I let her have a say in her costume this year - she was so excited to wear it! Although the requests and plans for next year have already started. Let's just say it starts with a p and ends with a 'rincess'. Mommy is not too thrilled, but she has 364 days to change her mind! (And knowing her, she'll want to be 364 different things in the meantime!)

You can't get a good look at my costume, but I made a simple skirt out of a purple poly-satin I found in the remnant bin at Hobby Lobby for something around $.79 and made a poufy underskirt out of green tulle that cost $.17! My hat came from the dollar section at Target and my socks were a great deal at JoAnn's. I added black shoes and a black top and my outfit cost about $6. Win! Samantha was really excited that mommy dressed up, though she did tell me I needed a broom. Maybe next year when I don't have to push a stroller!

Hope you all had a happy Halloween! Now, as one of my friends said, onto the pie holidays! :)