I have quite a backlog of projects that I never blogged, so I thought I'd bring some out here every once in a while. Today's is one of my all-time favorite projects.
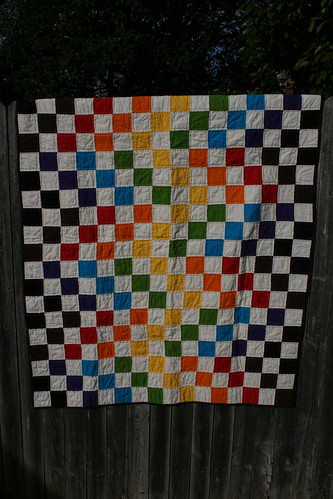
One of our very good friends was married last spring, one day after our babies were born. Obviously, we were unable to attend the wedding. I knew that we probably wouldn't get to go based on my due date, so I wanted to make them an extra special gift. A quilt was my immediate thought, but what kind? What colors? They don't live very close and we don't get to see them often, so I wasn't sure exactly what their tastes were. However, some snooping on their wedding registry revealed that they were registering for Fiestaware - one setting each in a variety of colors. I grabbed my smartphone and headed to the Kona section at JoAnn's. I chose 8 colors and Kona Snow.
I used this great pattern from Fat Quarterly, and whipped up this baby! I had some trouble with the strips biasing, so I wasn't able to get the requiste number of strips out of my piecing, but I don't think it made a huge difference. If I made it again I think I'd just piece the squares - which I really enjoy doing. I had trouble wrangling the strips on my cutting mat as well, so piecing the squares would be much easier!
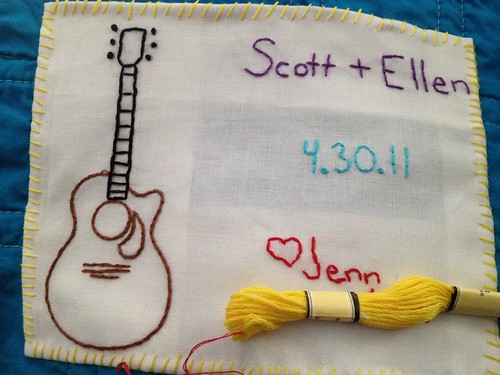
I quilted it with straight lines .25" away from each seam. Scott is a musician, so I incorporated that into the label.
They loved the quilt - they said that they had gotten another quilt that they were fighting over, so they were glad to have two!
Friday, September 28, 2012
Thursday, September 27, 2012
Fall Clothes part 2/Gearing up for KCWC
I meant to post yesterday for WIP Wednesday, but we have been without internet since Tuesday. Praise the lord for small miracles - so glad to have it back! So instead, I thought I would share the rest of the clothing I have made for Samantha already this fall.
I shared the tops I made for her here, and her back to school dress here.
I whipped up some simple skirts for her with some cute prints. I couldn't resist this donkey print, and when the shop I was ordering the fabric for her birthday skirt had this print too, I had to have it.
We had a dino birthday party this year (hopefully I can get my pictures uploaded and edited this weekend, and share that with you next week!), so we had to have a dino skirt. We chose some of Ann Kelle's adorable fabric, and I made another simple skirt.
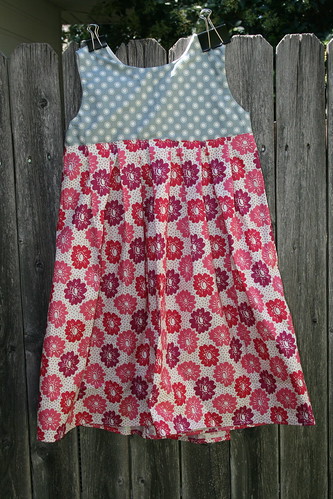
I also wanted to make her another dress. Anna Maria Horner had just released her Paper Fan Dress Pattern, so I decided to use that one. I agonized over what fabrics to use, and what I had in my stash that was enough for the very full, wrapped skirt. I settled on this combination, and I really like it. Unfortunately, I made a size five, thinking she could wear it for two years, and it is huge. It will be put away until she grows into it, and I'll probably make another one that fits for this year! It was a good pattern for me to try out new skills on (first knife pleats). One problem I had was that the seam allowance called for after you fold the skirt up to the bodice (after you sew it to the bodice) didn't enclose the seam, so I had to sew the seam allowance much narrower, which ran into my buttonholes a bit. However, I made it work, and I think it looks OK.
Now to pick patterns for KCWC!
Tuesday, September 25, 2012
Handmade Birthday Gifts
Samantha's birthday was last week, and I have been busy stitching up a few birthday gifts for her. (My apologies for the less-than-stellar pictures in today's post - I was taking the pictures very quickly during 'naptime' before they needed to be wrapped on her birthday! Talk about cutting it close!)
I whipped up a set of placemats and napkins for her baby dolls to use when she feeds them. Best part? They are reversible!
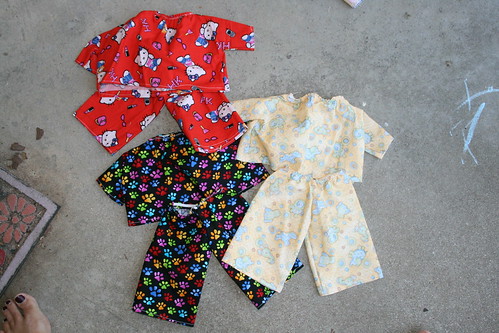
She is very into changing her baby dolls' clothes lately. Most of her doll clothes are hand-me-downs from my Cabbage Patch Kids! She has Corelle dolls and two from Target, all of which are significantly smaller than the CPKs, so their clothes are way too big. I googled a lot, and there are no patterns specifically written for Corelle dolls (I guess if you can afford them, you can afford their ridiculously priced clothes?). I found this simple pattern, which was a bit too big for the Corelle dolls, but fits the Target babies well, and we are making it work for all of them. I enjoyed using up some stash that had no prior purpose, or was left over from another project. Yay for a free gift!
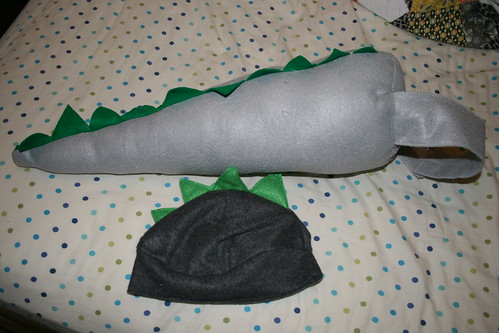
Since she was having a Dino themed birthday party, and is very into dressing up, I knew she needed some new items for the dress-up box! I loved this pin when I saw it, and it is a great quick and easy pattern. I know a nephew who might need a dino tail for Christmas!
I wanted to make a hat to go along with the tail, and I tried to use this pattern, but it wasn't working for me. So I tried to use another and it came out way too big. I made it work though, but making the band the appropriate size and hiding some of the extra 'bigness' in the top of the hat in the band attachment. It's pretty cute!
The tail and hat are adorable on any kid and my husband has even tried to wear the tail (it is too small, even for his skinny self). I see more dino dress-up sets in my future sewing!
I think she was most excited about the doll clothes - she opened them up, pulled out a shirt, looked at it for a minute and said "is it doll clothes?" Yay for gifts people can identify! ;)
Monday, September 24, 2012
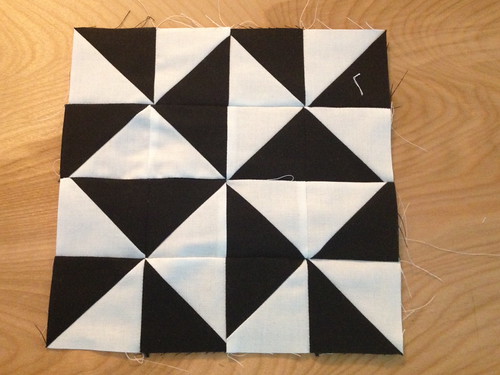
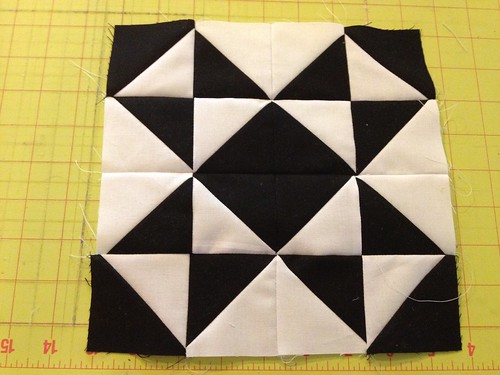
Modern Half Square Triangles Quilt-a-Long Block 3
Good afternoon! My apologies for getting today's post up later than normal. We've had company in town and a big 4th birthday party, and I totally spaced on scheduling my post for this morning! Anyway, here is block 3!
(If you are just joining us, information about materials can be found here, and here are the previous blocks: Block 1, Block 2.
Create your blocks, following the same procedure as last week. If you need help making your blocks, please see this post. You should end up with 16 2.5" squares. Ready to lay out your block? Here we go!
After you have sewn your squares into rows, press your seams. I like to press odd numbered rows to the left, and even to the right. It helps to use a small piece of paper to number your rows. I like the tiny post-it notes.
After pressing, you are ready to sew your rows together! Pin, if necessary, but I find that these short rows don't require pinning.
(If you are just joining us, information about materials can be found here, and here are the previous blocks: Block 1, Block 2.
Materials:
8 3.5" squares of Color A
8 3.5" squares of Color B
*note* these are the essential materials for each block, so you can cut several blocks worth of fabric at once to save time!
8 3.5" squares of Color A
8 3.5" squares of Color B
*note* these are the essential materials for each block, so you can cut several blocks worth of fabric at once to save time!
Create your blocks, following the same procedure as last week. If you need help making your blocks, please see this post. You should end up with 16 2.5" squares. Ready to lay out your block? Here we go!
ROW 1
ROW 2
ROW 3
ROW 4
After you have sewn your squares into rows, press your seams. I like to press odd numbered rows to the left, and even to the right. It helps to use a small piece of paper to number your rows. I like the tiny post-it notes.
After pressing, you are ready to sew your rows together! Pin, if necessary, but I find that these short rows don't require pinning.
Press one final time, and voila! Another finished block! Only 69 to go! Remember to add your blocks to our flickr group!
Thursday, September 20, 2012
Superheroes!
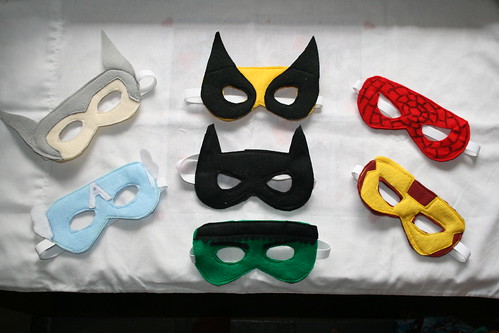
Samantha and our neighbor boys have been big into the dress up lately. We've been pirates, and knights, but superheroes have really taken hold of Liam (Samantha's best friend). He had a Spiderman birthday party, and I knew he would like some fresh dress-up goodies! I had seen the pattern for these masks on pinterest, and decided that they would be perfect!
The boys have been wearing them every day, and they were quick and easy to make - a great gift!
Liam gave out superhero capes as party favors and they have been enjoyed in our house! You can see more pictures from the party on his mom's blog.
The boys have been wearing them every day, and they were quick and easy to make - a great gift!
Liam gave out superhero capes as party favors and they have been enjoyed in our house! You can see more pictures from the party on his mom's blog.
Wednesday, September 19, 2012
WIP Wednesday: The Quilt top Edition!
I have finished three quilt tops in the past few weeks! This is highly unlike me - I usually finish one quilt before starting on the next. Part of this unusual behavior is due to the basting and now, hand quilting of my modern crosses quilt. Most of my basting pins are in use! An additional part was that I borrowed a friends Go! Baby circle die, so I wanted to get that top finished as soon as I cut all those circles! Here they are, waiting for basting:
Wonky Stars
I finally decided on backing fabric for this one, so I can get it basted now (as soon as the pins are free!). But I have no idea how to quilt it. I haven't done FMQ yet, so it will probably be some kind of straight lines.
Jingle Circles Quilt
I have the backing fabric for this, so now I just need to get it basted! I'll probably baste and quilt this one next, as it isn't as big as the others, so it won't take as many pins!
Triangles Quilt
This one I just finished today! This one was a labor of love and collaboration with my hubby (the math teacher). There was a lot of seam ripping at the beginning, but I figured out fairly quickly how to not lose my points. I wasn't sure about it at first, but I think I really like it now!
Linking up with Lee at Freshly Pieced. What have you been working on this week?
Tuesday, September 18, 2012
A new bag
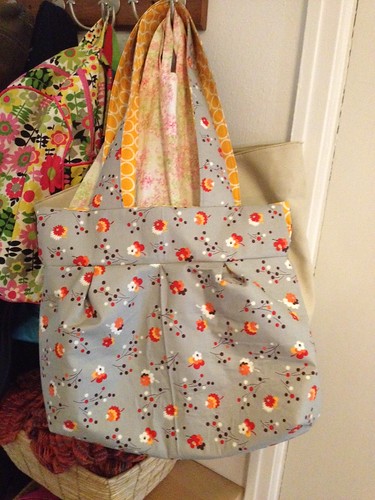
For a few weeks now it's been apparent that I needed a new bag/purse/carry-all-my-kid's-stuff receptacle. My favorite linen 'summer' bag just wasn't quite big enough (and it's very summery), and my other bags weren't quite right for a number of reasons (too big, too small, to tall, etc). I've been wanting to make my own bag for a while.
After much googling, I decided on the Wasp Bag. I liked the dimensions of it, and it looked roomy enough. I wanted it to be 'fall-ish', but not too much so that I couldn't use it outside of fall. I chose a print from Flea Market Fancy on the outside, and some Metro Living Dots for the interior.
I used some pretty stiff interfacing, but it helps the bag hold it's shape. I left off the interior pocket and key fob (I love the idea of those, but never have the second it takes to attach my keys!). I also did not use leather for the handles, nor did I do the leaf bit on the handle. My handles ended up a bit too long, but they are not too bothersome. I'd shorten them a few inches if (when) I make this bag again.
I really like it, and I've received several compliments on it! All, in all, a win!
Monday, September 17, 2012
Modern Half Square Triangle Quilt a long Block 2
Welcome back! I hope you've had a chance to stitch up Block 1, or at least gather your supplies!
Materials:
8 3.5" squares of Color A
8 3.5" squares of Color B
*note* these are the essential materials for each block, so you can cut several blocks worth of fabric at once to save time!
Create your blocks, following the same procedure as last week. If you need help making your blocks, please see this post. You should end up with 16 2.5" squares. Ready to lay out your block? Here we go!
Row 1
Row 2
Row 3
Row 4
After you have sewn your squares into rows, press your seams. I like to press odd numbered rows to the left, and even to the right. It helps to use a small piece of paper to number your rows. I like the tiny post-it notes.
After pressing, you are ready to sew your rows together! Pin, if necessary, but I find that these short rows don't require pinning.
Press one final time, and voila! Another finished block! Only 70 to go! Remember to add your blocks to our flickr group!
Friday, September 14, 2012
Modern Crosses Quilt
I showed a tiny bit of this quilt on Wednesday, but I realized I hadn't shown you the whole quilt top! I finished the top right before we went on our trip last month, so it slipped between the blog cracks, as it were.
I started this quilt back in June, I think. I received the book Modern Log Cabin Quilting for Christmas last year, and I loved it, but wasn't immediately inspired (although I LOVED the cover quilt). So, back in June, when I was 'between projects' and looking for something to take to the guild sewing Saturday, I pulled out my books for new inspiration. I decided to use a long hoarded jelly roll of Happy Daisy, and some Kona Snow. I changed my block size to use the jelly roll (the pattern calls for 2" strips and I wasn't going to trim down the jelly roll), and I ended up needing a lot more of my solid fabric than the pattern called for because of that. (I tried to do accurate math so that I would have enough, but I just didn't get it figured out correctly this time!).
I only wanted to use each strip of the jelly roll once, and since my blocks were bigger, I made fewer blocks than the pattern calls for. I felt like the chain piecing and trimming down of the blocks was time consuming, but in the end, I'm sure it was probably a bit faster than precutting everything.
I really like how this one is turning out. The pattern calls for tying the quilt with buttons in the center of each cross, but I was worried that that wouldn't be enough since my blocks were bigger, so I'm hand quilting around each cross with yellow, blue, green and red perle cotton. I do think I'll dig through my vintage button stash and add the buttons too - I just love the idea of the buttons!
Thursday, September 13, 2012
Back to School Clothes
I have been wanting to sew more and more clothes for my kiddos, and with back to school for Samantha, what better time? I wanted to try out a few things to practice, and make some easy projects. I searched through my pinterest boards, and selected two tops to start with. Digging through the stash made my choices a bit more difficult, but in the end, I had enough fabric for both of these tops. I have a bad habit of only buying one yard cuts of prints I like for clothes, and for most dresses and tops for Samantha that isn't enough yardage anymore. When did she get so big? (Let's not talk about the fact that she'll be 4 next week!)
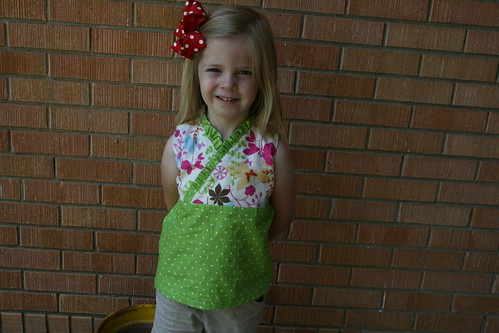
This is the Pop Pop Preppy Top. It looks like not many folks have made this top, but it is so cute! The bodice is lined, which is nice. I used two remnants of fabric I grabbed at Hobby Lobby on a whim, and Kona Snow leftovers for the lining.
I completely didn't understand her directions for the elastic band that goes under the bodice. I tried and tried to make sense of it, and spent way too much time with my seam ripper as a result. In the end I decided that the top was still cute without it, and that it probably would have been too short with the elastic band. Next time I'll cut it a bit longer. I'm already planning how to size this one up for next spring - it probably won't fit for too long, but it is a good fit now, and she's already worn it about 5 times since I finished it.
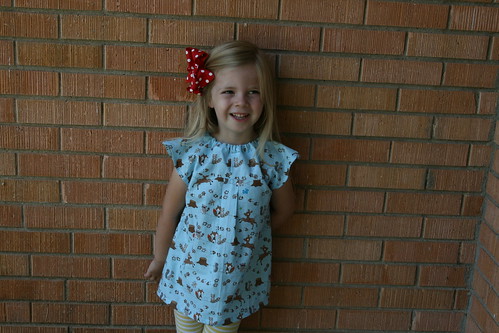
This one is the Emerson Tunic. I used a print that I had originally stashed to make pants for Ben, but I knew Samantha would love the animals, and it turned out pretty cute! One thing not called for in the directions is that you need slightly more yardage if you are using a directional print, like this one.
I did a few modifications on this top. I didn't do the faux buttonband in the back, because I knew Samantha would complain about the buttons hurting her back when she was in her car seat or sitting in chairs/on the couch. I didn't add the button on the front either, and I'm looking for an acorn button or something else cute to put there.
I found some of the directions confusing. For example, where does the side start and the sleeve end? It's hard to judge where to sew down the side, but I think I did fine. Also, I didn't turn under the sleeves to hem them until after I had joined the shoulders, which I was glad about, because I don't know how I would have hidden the end of the shoulder seam otherwise.
I also didn't do the facing bit for the neckline. Samantha is totally not bothered by the seam on her neck. The neck opening is a bit small - she can get it over her head, but needs help taking it off.
All in all, pretty cute! I have a few other things done that I haven't photographed yet, and I'm planning a few more things for fall (probably will wait until Kid's Clothing Week Challenge starts up again). I would love to hear about your favorite patterns for kid's clothes. I've bought several Oliver +S patterns, but I bought the size 5-12, and Samantha is so skinny I don't think they'll fit for a few years!
Wednesday, September 12, 2012
WIP Wednesday
I've been busy this week, but have little sewing to show for it. Last weekend it was finally below 100 degrees, so we spent a lot of time playing outside. It was very nice, but not very productive!
I did start hand quilting my modern crosses quilt. I like it so far, but I have a lot more to go!
We're also in full party prep mode around here. I'm stitching up a while wardrobe of baby doll clothes, and some dinosaur dress up items. Hoping to squeeze in some quilty sewing at the end of the week and next week. Fingers crossed!
Linking up to WIP Wednesday
Tuesday, September 11, 2012
Snapshots Quilt
A few years ago I bought a FQ bundle of Full Moon Modern. I loved the black and white prints, and knew I wanted to make a black and white quilt. I debated for a long time about what to use, and finally settled on Elizabeth Hartman's Snapshots pattern from The Practical Guide to Patchwork.
I did not strip piece my blocks, instead I cut each one (I actually like cutting small pieces!). I used a large piece from my stash (that I originally bought to make a skirt for me out of, but didn't account for the directional print of the fabric!), and a small amount of yellow. I bound it in Kona Pomenegrante. I quilted x's through the white squares, allowing the prints squares to pop.
I really like the way this quilt turned out!
Monday, September 10, 2012
Modern Half Square Triangle Quilt-a-long Block 1
Good morning! Welcome to the first block tutorial for our Modern Half Square Triangle Quilt-a-long! I hope you have had a chance to gather your supplies!
Today's tutorial will be a bit more in-depth, as we will discuss how to make a half square triangle block, and then we'll layout and piece the block itself.
Materials:
8 3.5" squares of Color A
8 3.5" squares of Color B
*note* these are the essential materials for each block, so you can cut several blocks worth of fabric at once to save time!
How to make a Half Square Triangle Block:
Cut 8 squares of each color. Using your lightest colored squares and a water-soluble pen (I always use a mechanical pencil. I used a water-soluble pen once and marked all of my lines for a quilt and by them time I got around to sewing them, the lines had all disappeared! I have not had a problem with my pencil marks - since we are going to cut on this line you shouldn't see anything through the fabric), draw a diagonal line from corner to corner.
Place a color A square on top of a color B square with your diagonal line facing. Using a scant 1/4" seam allowance, sew a line 1/4" away from your marked line on each side of the line. Now, using your clear acrylic ruler and your rotary cutter, cut carefully on the line. You should now have 16 blocks. Press your squares open, pressing your seam to the darker color.
Now it is time to square up your blocks. I like to use a square ruler to do this, but you can also do it with a regular clear ruler. Place the 45 degree line on your line between color A and color B, and trim your square down to 2.5" Repeat for all 16 blocks.
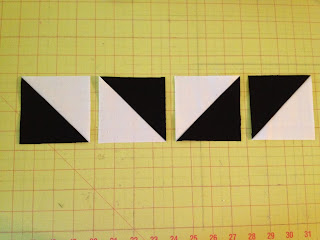
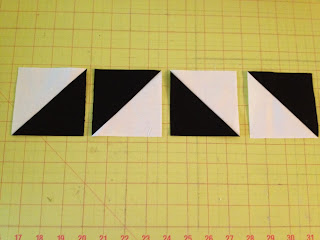
Now it is time to layout the block! Yay - this is the fun part! Follow these pictures to show you how to layout each row.
ROW 1
ROW 2
ROW 3
ROW 4
Now sew your blocks together as you laid them out. Press your seams, alternating directions (I always press odd numbered rows to the left, and even to the right.)
Now lay out your rows - another picture for you to make sure you have them laid out correctly and didn't flip anything while sewing or ironing!
Sew your rows together, and ta-da! A finished block!
Yay you! One block done, and only 71 more to go! :)
Come back next Monday to make Block 2! Please add your blocks to our flickr group!
Friday, September 07, 2012
FO Friday!
I'm so excited to share these recent knitting FOs with you! I actually finished them a few weeks ago, but kept forgetting to blog them!
I knit up this Rosebud Hat for MadTosh's Cabling Class (which sadly no one signed up for. :( ). This is a Brooklyn Tweed pattern, so it was extremely well-written, with a great chart and clear directions. The yarn (Madelinetosh Tosh Mo) is a mohair blend that while it shed all over me, it was a great yarn! The cable is a bit difficult on this pattern (it is a 12 stitch cable cross), but doable. I really enjoyed this one. I knit the longer length choice.
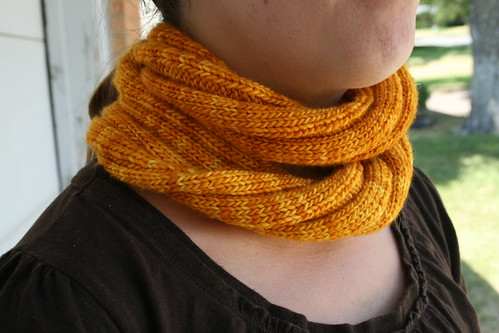
This lovely cowl was the pattern choice for our beginning knitting class. It is the Looped Loop pattern, although we modified it so that our beginning knitters would not have to do a provisional cast on and complicated grafting. This is Madelinetosh Tosh Merino in Gilded. Yummy. If I knit this again I would lengthen it - I knit it to 44 inches before seaming, and I would like it longer.
And finally, the Gift Wrap Baby Sweater. I used Madelinetosh Vintage (such a lovely yarn!). I really really enjoyed this pattern - very easy, very cute! I love that it goes from NB-2 years and that it has short and long sleeve options. I will be knitting this one again!
Thursday, September 06, 2012
Knitting Classes
I wanted to share quickly with you some of the upcoming classes we are having at MadTosh. I am teaching Beginning Sock Knitting starting Sunday, September 9th at 2 pm. These will be top down, heel flap, very basic socks.
Also, starting on the 13th, I'm teaching a class on the Effortless Cardigan. This is a great, easy, top down sweater. Perfect for beginning sweater knitters!
There are some other great knitting classes and we're offering sewing and quilting classes starting this month! Some more exciting things are on the horizon, so stay tuned! And please, let us know if you would like to see a certain class!
Also, starting on the 13th, I'm teaching a class on the Effortless Cardigan. This is a great, easy, top down sweater. Perfect for beginning sweater knitters!
There are some other great knitting classes and we're offering sewing and quilting classes starting this month! Some more exciting things are on the horizon, so stay tuned! And please, let us know if you would like to see a certain class!
Wednesday, September 05, 2012
WIP Wednesday
I have been overwhelmed with ideas for new quilts and other sewing projects lately, and I feel like I'm sewing as fast as I can to get them all out of my system!
I have been wanting to make a wonky star quilt with a bunch of dot fabrics I've had stashed. I loosely followed Elizabeth Hartman's Sparkle Punch Quilt directions, and I really like this one. the top is pieced now and I just need to decide on backing fabric and get it basted!
I finally got my hands on some Jingle. I've been wanting fat quarters, but not of the entire line. I purchased mine from Sew Love Fabrics, and she was a delight to work with - super fast shipping and swapped a FQ in one bundle so I didn't get a duplicate print. One of the sweet members of my MQG let me borrow her Go! Baby Circle Die so I didn't have to cut 88 circles out by hand! They are all appliqued to the squares and now I get to lay out my design!
And I've been wanting to make a quilt with triangles, but not half square triangles. I purchased some of the Robert Kaufman Quilter's Linen from MadTosh a few weeks ago, and I've been wanting to use 'regular' linen in a quilt as well. Hubby helped me lay out a few designs, and I think this one will be the winner. Now to practice piecing these triangles!
And of course, I'm busy piecing and trimming my HSTs for the Modern Half Square Triangle Quilt-a-long! Got to keep ahead! :)
I'm busy planning some fall clothes for my kiddos too, but I also need to make room in my sewing schedule for some upcoming birthday gifts! My big girl is almost 4, and I have a long list of things I want to make for her!
Linking up with Lee atWIP Wednesday!
Tuesday, September 04, 2012
Knitting Season
Labor Day has come and gone, and with it the unofficial end to summer. Even though temperatures here will be over 100 today and we won't need sweaters for at least 4-6 more weeks, I think of this time of year as high knitting season. Especially with little ones that will most likely outgrow their sweaters within a season, I need to kick my knitting into high gear!
This weekend, as football season began, I couldn't help but wish we had a 'knitting season.' It hardly seems fair that all the sports get their own seasons, why shouldn't we? So I propose that knitting season starts now. We knit as much as we can, as fast as we can before our kiddos (and ourselves, if we're lucky!) need the warmth of wool.
Hubby and I were even joking about having a fantasy knitting team - choose your favorite knitters and/or knitting bloggers, and you get points for each item they finish. Would be a great way to cheer each other on! However, I'm not sure I have the gumption to organize something like that. Maybe a Ravelry group is more practical? Points awarded for finished projects - more points for large objects or points awarded by yardage used up? And it would be OK if these are projects you have already started.
I know that I need to figure out a way to balance the things I want to sew with the things I want to knit. I need to finish these projects, and I have things to knit for upcoming classes at MadTosh. I also failed in my Ravellenic Games attempt, and only finished one lonely sleeve. It would be nice to wear a new sweater this winter!
Anyone else up for celebrating knitting season?
Subscribe to:
Posts (Atom)