I have entered JoAnn's Simply for Baby Handmade Nursery Contest. You can see my video of Ben & Ellie's nursery here. I haven't shared all of the handmade things on the blog yet, but I'll get to that - maybe this week?
Enjoy!
Friday, June 29, 2012
Thursday, June 28, 2012
A Return to Knitting
So this blog used to be about knitting, right? :) And I do still knit, though the sewing has taken over in a big way, especially since I hurt my hand last fall and could barely knit at all. Thankfully, with rest it has gotten much better. I still have to take it easy when I knit with tiny needles (which is bad for all those socks I wanted to knit hubby!), but I can knit for good stretches at a time, when the kids let me!

I started this project this winter, when I was going through a particularly stressful time, and needed something easy and pretty mindless to knit. I pulled some yarn from the stash and got started. Unlike much of my knitting, this project has no intended recipient.
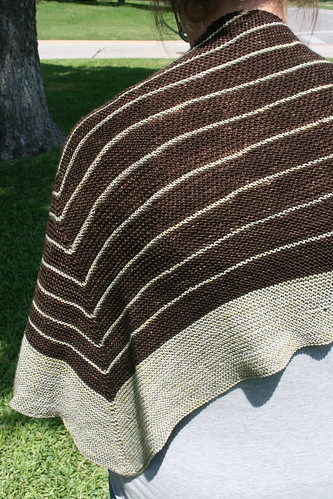
I wished it had blocked out a bit bigger, but it is what it is. I liked the squishiness of the garter stitch and that lovely brown (Malabrigo sock yarn). Ravelry details here. More knitting to come!

I started this project this winter, when I was going through a particularly stressful time, and needed something easy and pretty mindless to knit. I pulled some yarn from the stash and got started. Unlike much of my knitting, this project has no intended recipient.

I wished it had blocked out a bit bigger, but it is what it is. I liked the squishiness of the garter stitch and that lovely brown (Malabrigo sock yarn). Ravelry details here. More knitting to come!
Monday, June 25, 2012
A Quilt for Us
Over the last nearly 4 years I've been 'quilting' (making quilts? Am I really a 'quilter'? When do you give yourself that title?), I haven't made a quilt for our bed. Lots of other folks have quilts and we have lots of throw quilts, but not one for our bed. That is now changed!
I had been waiting for our 'new' room to be done - we moved into a new room when we added on to our house last spring. The twins are in our old room and we have a new master bedroom in our new 'wing' of the house. It still needs a lot of sprucing, (right now it feels like an apartment room - no personality!) but a new quilt is a good start! When we moved rooms we decided that no pets would sleep with us (previously they all did!), so we don't have to worry too much about having a nice quilt that dogs and cats could demolish (one of our dogs like to chew on things and has ruined all of our previous bedspreads/quilts and many of our sheets).
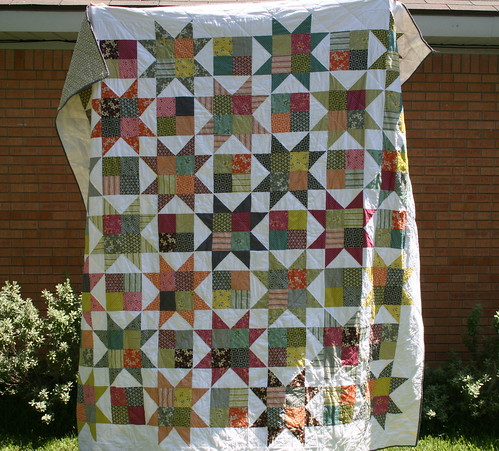
Choosing fabric and a design was the hardest part (of course!). Two years ago I had asked hubby to get me a fat quarter set of Hope Valley, and had been hoarding it for just the right project. We decided to use that (with some Kona White and Kona Coal). Hubby had to have a large say in the design. I wanted to do the Swoon pattern, but he vetoed it (something about the sizes/symmetry of the corner rectangles and triangles if I recall correctly. It's the math teacher in him). We settled on the Plan C quilt from Schnibbles Times Two. I enlarged it by adding blocks to make it five stars by five stars instead of three by three. That made 25 stars, and since I had 24 Hope Valley prints, I used Kona Coal for the center star.
Hubby even helped me lay out the blocks so that we could make sure each star didn't contain the same print inside that was in the star points. This was my first time making a flying geese block, so I practiced on scrap fabric before starting. I did loose some star points, but I don't think it looks too bad for my first try.

I added four inch borders on each side, bringing the finished quilt size to about 98". It barely fit in our playroom floor, so I can't baste a quilt any bigger than this in my house! I did minimal quilting - just 1/4" outside the star lines on the diagonal and through the center of the four blocks that alternated with the stars. We had a disagreement on the fabric for binding (I wanted to use some DS Quilts fabric that was grey with white dots) and he won - more Kona Coal. I do like it though. I used a grey and yellow and white print from JoAnn's for the backing with a touch of white and yellow.
As soon as we finish up a few more projects in our room, I'll take some pictures of it in there for you too!
Oh, and I'm linking up with Sew Modern Monday today! Go look at some other great finished projects!
I had been waiting for our 'new' room to be done - we moved into a new room when we added on to our house last spring. The twins are in our old room and we have a new master bedroom in our new 'wing' of the house. It still needs a lot of sprucing, (right now it feels like an apartment room - no personality!) but a new quilt is a good start! When we moved rooms we decided that no pets would sleep with us (previously they all did!), so we don't have to worry too much about having a nice quilt that dogs and cats could demolish (one of our dogs like to chew on things and has ruined all of our previous bedspreads/quilts and many of our sheets).

Choosing fabric and a design was the hardest part (of course!). Two years ago I had asked hubby to get me a fat quarter set of Hope Valley, and had been hoarding it for just the right project. We decided to use that (with some Kona White and Kona Coal). Hubby had to have a large say in the design. I wanted to do the Swoon pattern, but he vetoed it (something about the sizes/symmetry of the corner rectangles and triangles if I recall correctly. It's the math teacher in him). We settled on the Plan C quilt from Schnibbles Times Two. I enlarged it by adding blocks to make it five stars by five stars instead of three by three. That made 25 stars, and since I had 24 Hope Valley prints, I used Kona Coal for the center star.
Hubby even helped me lay out the blocks so that we could make sure each star didn't contain the same print inside that was in the star points. This was my first time making a flying geese block, so I practiced on scrap fabric before starting. I did loose some star points, but I don't think it looks too bad for my first try.

I added four inch borders on each side, bringing the finished quilt size to about 98". It barely fit in our playroom floor, so I can't baste a quilt any bigger than this in my house! I did minimal quilting - just 1/4" outside the star lines on the diagonal and through the center of the four blocks that alternated with the stars. We had a disagreement on the fabric for binding (I wanted to use some DS Quilts fabric that was grey with white dots) and he won - more Kona Coal. I do like it though. I used a grey and yellow and white print from JoAnn's for the backing with a touch of white and yellow.
As soon as we finish up a few more projects in our room, I'll take some pictures of it in there for you too!
Oh, and I'm linking up with Sew Modern Monday today! Go look at some other great finished projects!
Friday, June 22, 2012
First Birthday Quilts
Way back when I was pregnant with Samantha I wanted to make a quilt. I'd been sewing since I was a little girl, and had recently taken it back up again (although all I was sewing were tote bags for my knitting projects and simple skirts for myself). But a quilt - that's just cutting and sewing straight lines, right? I bought a bundle of fabrics at JoAnn's, and cut it up into squares. And the squares sat and sat and sat.
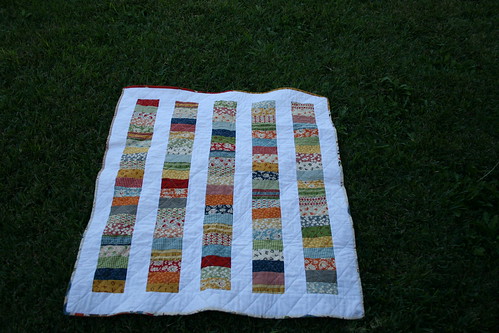
The spring of 2009 my mom and I went to visit a real live quilt shop, right here in my town! I knew NOTHING about how much fabric it would take to make a quilt, or really anything, but I picked out some fabric already cut into little squares and some yardage that I liked that I figured I could use as a back. I had gotten the book Last Minute Patchwork and Quilted Gifts for Christmas that year, and there was a cute coin quilt in there I thought I could make. I ended up using a tutorial over at the Moda Bake Shop though, since I had charm squares, and wasn't brave enough to figure something else out.
I cut my charm squares in half, and sewed them together in rows, added some white sashing, and learned to baste! (Thanks internet!) I used painter's tape to mark diagonal lines and quilted it. Added some binding, and voila! A first finished quilt! (The fabric is Wee Play, and if I had known then how much I would love it, I would have bought a lot more! I do have a jelly roll stashed away for someday!)
Since I had made a quilt for her first birthday I figured I had to make quilts for Ben & Ellie's birthday as well. When Aneela Hoey's Sherbet Pips line came out I loved it. I had a gift certificate I had received for Christmas, and I had seen previews of her Little Apples line too. I figured these two lines complimented each other and would be cute for twin quilts! I purchased a jelly roll of each, with no plans for what I would make. This spring I got down to business, and spent a lot of time looking through my quilt books, my flickr favorites and my pinterest quilt board. I decided on two patterns (they also happened to be from the Moda Bake Shop!), and started cutting.
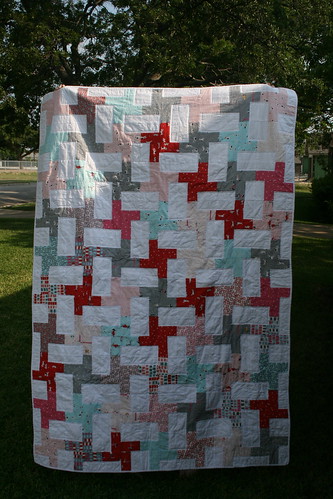
Ellie's quilt used the Cartwheels pattern and Kona White. I wish now I had added borders to the quilt, but it it still cute.
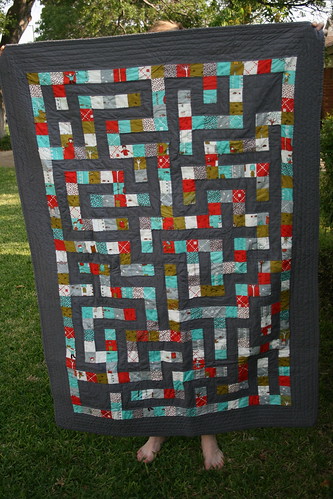
Ben's quilt used the Charming Maze pattern and Kona Coal. I love it - so cute and the maze actually 'works!'
Three kids, three first birthday quilts! And the twins were even done in time for their birthday! (Samantha's was about 3 days late!)
The spring of 2009 my mom and I went to visit a real live quilt shop, right here in my town! I knew NOTHING about how much fabric it would take to make a quilt, or really anything, but I picked out some fabric already cut into little squares and some yardage that I liked that I figured I could use as a back. I had gotten the book Last Minute Patchwork and Quilted Gifts for Christmas that year, and there was a cute coin quilt in there I thought I could make. I ended up using a tutorial over at the Moda Bake Shop though, since I had charm squares, and wasn't brave enough to figure something else out.
I cut my charm squares in half, and sewed them together in rows, added some white sashing, and learned to baste! (Thanks internet!) I used painter's tape to mark diagonal lines and quilted it. Added some binding, and voila! A first finished quilt! (The fabric is Wee Play, and if I had known then how much I would love it, I would have bought a lot more! I do have a jelly roll stashed away for someday!)

Since I had made a quilt for her first birthday I figured I had to make quilts for Ben & Ellie's birthday as well. When Aneela Hoey's Sherbet Pips line came out I loved it. I had a gift certificate I had received for Christmas, and I had seen previews of her Little Apples line too. I figured these two lines complimented each other and would be cute for twin quilts! I purchased a jelly roll of each, with no plans for what I would make. This spring I got down to business, and spent a lot of time looking through my quilt books, my flickr favorites and my pinterest quilt board. I decided on two patterns (they also happened to be from the Moda Bake Shop!), and started cutting.

Ellie's quilt used the Cartwheels pattern and Kona White. I wish now I had added borders to the quilt, but it it still cute.

Ben's quilt used the Charming Maze pattern and Kona Coal. I love it - so cute and the maze actually 'works!'
Three kids, three first birthday quilts! And the twins were even done in time for their birthday! (Samantha's was about 3 days late!)
Wednesday, June 20, 2012
WIP Wednesday
I've only got one picture of my WIPs this week (I actually only have this quilt and a few blocks - my only WIPs!!! Clearly I need to start more projects!).

This quilt top is almost done - just needs borders!
Now I have to decide what quilt to tackle next....

This quilt top is almost done - just needs borders!
Now I have to decide what quilt to tackle next....
Monday, June 18, 2012
Watermelon Dresses
Last summer I saw the cutest pin on pinterest that was a picture of a watermelon dress someone was selling on Etsy. I thought - huh, I could make that! But I just didn't get to it last summer (wonder why?), so I began looking for cute fabrics to make them for the girls this spring.

The original inspiration dress had a solid pink with a green polka dot for the trim. I didn't find anything like that, so I used solid green, and a tiny white dot on bright pink for the body of the dress. I used just under 1.5 yards of pink (I think) and 3/4 yard of green. I tried to cut the proportions similar to the body for the girls - so Ellie's trim is smaller and her ties are narrower than Samantha's. I did a basic pillowcase dress pattern.
I was lucky enough to find some bright pink bias tape that almost perfectly matched in my stash of vintage trims! I used scraps of black for the seeds - I just freehanded some ovals and cut them out of steam a seam and then ironed that on and cut the fabric out. Instead of zig zag stitching around each seed (each dress has 10 seeds), I sewed just inside the edge - I think it is fine if they fray a little.

After their candy corn dresses last fall, I decided to have these dresses tie on just one shoulder - so much easier to keep on! If I do the two ties again, I use bias tape from the edges, so that the ribbons/ties don't fall out as often.
Samantha loves her dress and wants to wear it whenever it is clean. She loves matching her baby sister. Reactions like that make mommy love sewing for her girls!

The original inspiration dress had a solid pink with a green polka dot for the trim. I didn't find anything like that, so I used solid green, and a tiny white dot on bright pink for the body of the dress. I used just under 1.5 yards of pink (I think) and 3/4 yard of green. I tried to cut the proportions similar to the body for the girls - so Ellie's trim is smaller and her ties are narrower than Samantha's. I did a basic pillowcase dress pattern.
I was lucky enough to find some bright pink bias tape that almost perfectly matched in my stash of vintage trims! I used scraps of black for the seeds - I just freehanded some ovals and cut them out of steam a seam and then ironed that on and cut the fabric out. Instead of zig zag stitching around each seed (each dress has 10 seeds), I sewed just inside the edge - I think it is fine if they fray a little.

After their candy corn dresses last fall, I decided to have these dresses tie on just one shoulder - so much easier to keep on! If I do the two ties again, I use bias tape from the edges, so that the ribbons/ties don't fall out as often.
Samantha loves her dress and wants to wear it whenever it is clean. She loves matching her baby sister. Reactions like that make mommy love sewing for her girls!
Subscribe to:
Comments (Atom)