The pattern is available from Annie at Bird and Little Bird here. Kits are not currently available.
Friday, March 29, 2013
An Easter bunny
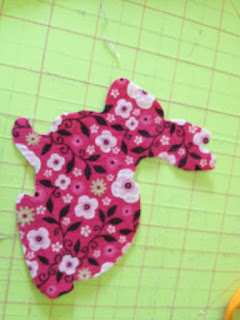
I made this bunny last year for Samantha. I won the kit several years ago, but was too intimidated to try it. I finally gathered my courage and set to work, and it wasn't scary at all! I actually really enjoyed making it, and sewing on her body parts so they would move. The pattern is extremely well written and clear. I think Samantha liked her pretty well!
Wednesday, March 27, 2013
WIP Wednesday
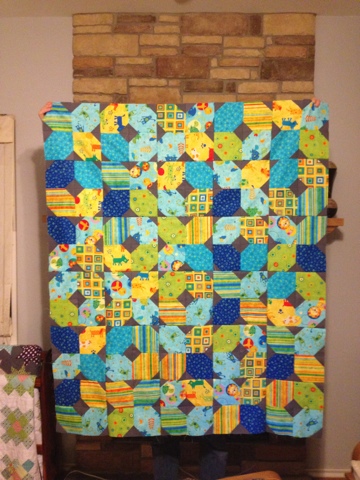
I haven't done much sewing this week. I did make the girls dresses and make the Easter basket goodies. Today I was excited to get my Simply Color quilt basted and get the quilt top for our impending arrival all sewn up. My mom is visiting this weekend, so I won't be sewing much, but I might get some fabric cut for the next quilts!
Linking up with Lee!
Linking up with Lee!
Tuesday, March 26, 2013
Easy Bunny Applique (tutorial)
Last spring I wanted to make something for Samantha to wear for Easter. She and Ellie were going to wear mine and my sister's old Easter dresses, so I thought a shirt that she could wear to school (and wear to hunt eggs Easter morning) would be more practical.
This is a super easy project and only takes about an hour!
Supplies: Steam A Seam Lite
Fabric of your choosing
Shirt
Iron
Sewing Machine
Thread
Picture/drawing to use for shape
This is a super easy project and only takes about an hour!
Supplies: Steam A Seam Lite
Fabric of your choosing
Shirt
Iron
Sewing Machine
Thread
Picture/drawing to use for shape
First you need to choose your shape. I found a bunny shape that I liked on the internet, and printed it off at a good size (make sure it won't overwhelm your tshirt area!). Then you trace it onto the back of the steam a seam - the side that does not come away easily. (if you are unsure about which side is which, please look at the package - it is very helpful!). If you are using a design that has words or numbers, make sure you trace it backwards. The nice thing about a shape like this is that it can face either direction.
Then you remove your paper backing and press your fabric onto the steam a seam, wrong side facing.
Then cut out your shape following the lines you traced previously.
Remove the other paper backing and press onto your shirt - use a lot of steam and press for 10-20 seconds. Technically you can be done at this point, but I think it looks more finished to stitch it down.
I used white thread and a zig zag stitch to stitch around the bunny shape. Keep your needle down to make it easier to turn your work around the curves and in the corners. Take your time!
Give it to a very happy girl! The great thing about this project is that the shirt still fits this year (I usually try to make things a little big so they fit longer!). She LOVES her 'bunny shirt' and wears it year round.
Monday, March 25, 2013
Modern Half-Square Triangle Quilt-a-Long Block 29
Welcome! If you are just joining us, information about materials can be found here, and here are the previous blocks: Block 1, Block 2, Block 3, Block 4, Block 5, Block 6, Block 7, Block 8, Block 9, Block 10, Block 11, Block 12, Block 13, Block 14, Block 15, Block 16, Block 17, Block 18, Block 19, Block 20, Block 21, Block 22, Block 23, Block 24, Block 25, Block 26, Block 27, Block 28.

Create your blocks, following the same procedure as last week. If you need help making your blocks, please see this post. You should end up with 16 2.5" squares. Ready to lay out your block? Here we go!

Materials:
8 3.5" squares of Color A
8 3.5" squares of Color B
*note* these are the essential materials for each block, so you can cut several blocks worth of fabric at once to save time!
8 3.5" squares of Color A
8 3.5" squares of Color B
*note* these are the essential materials for each block, so you can cut several blocks worth of fabric at once to save time!
Create your blocks, following the same procedure as last week. If you need help making your blocks, please see this post. You should end up with 16 2.5" squares. Ready to lay out your block? Here we go!
ROW 1
ROW 2
ROW 3
ROW 4
After you have sewn your squares into rows, press your seams. I like to press odd numbered rows to the left, and even to the right. It helps to use a small piece of paper to number your rows. I like the tiny post-it notes.
After pressing, you are ready to sew your rows together! Pin, if necessary, but I find that these short rows don't require pinning.
After pressing, you are ready to sew your rows together! Pin, if necessary, but I find that these short rows don't require pinning.
Press one final time, and voila! Another finished block! Only 43 to go! Pat yourself on the back! Remember to add your blocks to our flickr group!
Wednesday, March 20, 2013
WIP Wednesday-baby quilt
I finally decided on fabric for the baby's quilt. I had this bundle that I bought years ago that had been hanging out in my stash. I thought it would be cute to use for the baby's quilt. I am using the Road to Tennessee pattern and arranging my blocks in X's and O's (hugs and kisses from mommy!). I hope to get the blocks finished and start sewing them together this week, but I have Easter dresses to finish and Easter basket goodies to make!
Linking up with Lee!
Tuesday, March 19, 2013
Too many projects!
I have been on a bit of a project starting kick lately! I chose patterns for the kids sweaters for this fall/winter, and of course, I had to start right away (since it will take me several months to get them done!).
I also have been working on some new class and shop samples as well. Hoping to knock these out so I can start the baby's blanket!
Kindling Season for Samantha
A Sanctuary for Baby for Baby Boy
Korrigan for Ellie
Grow old with me for Ben
Hitchhiker Scarf
Aranami Shawl
Cabernet Hat
Sock Sample
Gelsomina Aran
And finally, yarn for the baby's blanket - now to get time to start it!
Monday, March 18, 2013
Modern Half-Square Triangle Quilt-a-Long Block 28
Welcome! If you are just joining us, information about materials can be found here, and here are the previous blocks: Block 1, Block 2, Block 3, Block 4, Block 5, Block 6, Block 7, Block 8, Block 9, Block 10, Block 11, Block 12, Block 13, Block 14, Block 15, Block 16, Block 17, Block 18, Block 19, Block 20, Block 21, Block 22, Block 23, Block 24, Block 25, Block 26, Block 27.
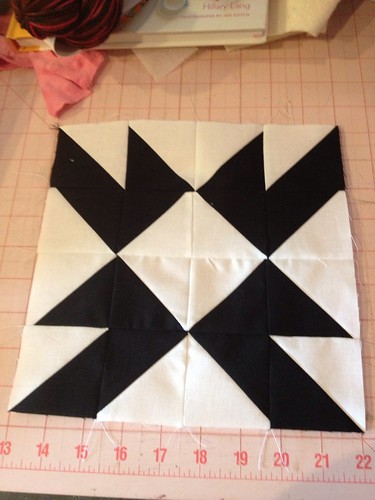
Create your blocks, following the same procedure as last week. If you need help making your blocks, please see this post. You should end up with 16 2.5" squares. Ready to lay out your block? Here we go!

Materials:
8 3.5" squares of Color A
8 3.5" squares of Color B
*note* these are the essential materials for each block, so you can cut several blocks worth of fabric at once to save time!
8 3.5" squares of Color A
8 3.5" squares of Color B
*note* these are the essential materials for each block, so you can cut several blocks worth of fabric at once to save time!
Create your blocks, following the same procedure as last week. If you need help making your blocks, please see this post. You should end up with 16 2.5" squares. Ready to lay out your block? Here we go!
ROW 1
ROW 2
ROW 3
ROW 4
After you have sewn your squares into rows, press your seams. I like to press odd numbered rows to the left, and even to the right. It helps to use a small piece of paper to number your rows. I like the tiny post-it notes.
After pressing, you are ready to sew your rows together! Pin, if necessary, but I find that these short rows don't require pinning.
After pressing, you are ready to sew your rows together! Pin, if necessary, but I find that these short rows don't require pinning.
Press one final time, and voila! Another finished block! Only 44 to go! Pat yourself on the back! Remember to add your blocks to our flickr group!
Friday, March 15, 2013
Shoo Fly Quilt
A dear friend of ours and his wife are expecting their first child this spring. I planned to make them a quilt, but wasn't sure what fabric to choose, or design to use. They like vintage things, so I ended up using some American Jane prints and an enlarged Shoo Fly block for a vintage feel.
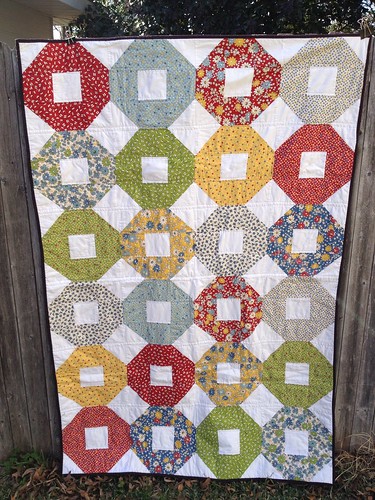
I really like the way it turned out! I used some stashed fabrics for the backing, and had just enough left over brown binding from other projects to fit!

I hope they like it!

I really like the way it turned out! I used some stashed fabrics for the backing, and had just enough left over brown binding from other projects to fit!

I hope they like it!
Wednesday, March 13, 2013
WIP Wednesday - in color!
I am very excited about this quilt top! On a bit of a whim, I purchased half yards of the Simply Color ombres. I decided to cut them into 2.5" squares and patchwork them back together. I love how it looks like so many more different colors! Now to choose backing fabrics and decide how to quilt it!
Linking up with Lee
Monday, March 11, 2013
Modern Half-Square Triangle Quilt-a-Long Block 27
Welcome! If you are just joining us, information about materials can be found here, and here are the previous blocks: Block 1, Block 2, Block 3, Block 4, Block 5, Block 6, Block 7, Block 8, Block 9, Block 10, Block 11, Block 12, Block 13, Block 14, Block 15, Block 16, Block 17, Block 18, Block 19, Block 20, Block 21, Block 22, Block 23, Block 24, Block 25, Block 26.
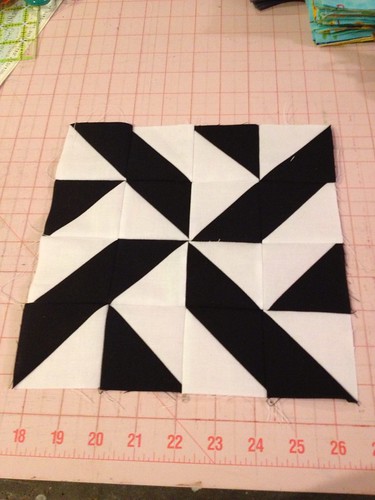
Create your blocks, following the same procedure as last week. If you need help making your blocks, please see this post. You should end up with 16 2.5" squares. Ready to lay out your block? Here we go!

Materials:
8 3.5" squares of Color A
8 3.5" squares of Color B
*note* these are the essential materials for each block, so you can cut several blocks worth of fabric at once to save time!
8 3.5" squares of Color A
8 3.5" squares of Color B
*note* these are the essential materials for each block, so you can cut several blocks worth of fabric at once to save time!
Create your blocks, following the same procedure as last week. If you need help making your blocks, please see this post. You should end up with 16 2.5" squares. Ready to lay out your block? Here we go!
ROW 1
ROW 2
ROW 3
ROW 4
After you have sewn your squares into rows, press your seams. I like to press odd numbered rows to the left, and even to the right. It helps to use a small piece of paper to number your rows. I like the tiny post-it notes.
After pressing, you are ready to sew your rows together! Pin, if necessary, but I find that these short rows don't require pinning.
After pressing, you are ready to sew your rows together! Pin, if necessary, but I find that these short rows don't require pinning.
Press one final time, and voila! Another finished block! Only 45 to go! Pat yourself on the back! Remember to add your blocks to our flickr group!
Subscribe to:
Comments (Atom)


