Friday, August 31, 2012

Nursery Tour

Here are some final shots of the nursery. Not the greatest lighting, but it will give you an idea of what the room looks like. The adorable valances and the crib sheets (which you can't see in any of these shots - boo!) were made by my sister.

Cribs

Glider corner

Shelves + Embroidery

Changing Table and Shelves

Nursery Corner

Thursday, August 30, 2012

For our last little project

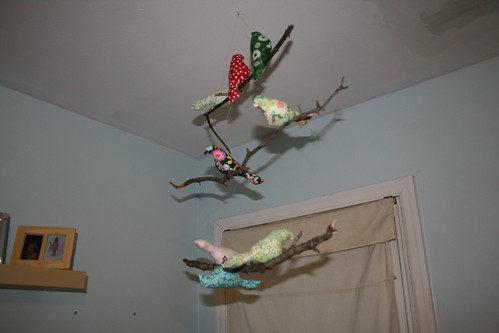
We made a mobile! I had loved this bird mobile from the first time I saw it (which was a while back!). I was a bit intimidated to try it (sewing curves is not my strong suit yet), but decided to give it a try. I used small bits and pieces of fabric from my stash and made 8 birds. They came together very quickly, but it took almost a year before hubby helped with the assembly and hanging of the branches.

Bird Mobile

I sewed the birds onto the branches, and then we used fishing line to tie the branches together and hang them from the ceiling. One bird is upside down because I bumped it right before I took this picture, and knew I might not have another chance to take another picture anytime soon, so upside down it stays. It needs to be resewn on.

And those are all the projects I made for the nursery! Check back tomorrow to see the final tour of the nursery!

Wednesday, August 29, 2012

Nursery Decorations

I loved stitching up the embroidery and cross stitch projects for the nursery, but I knew I wanted to sew some things as well. These were some of the last projects I did, but I really love them in the room.

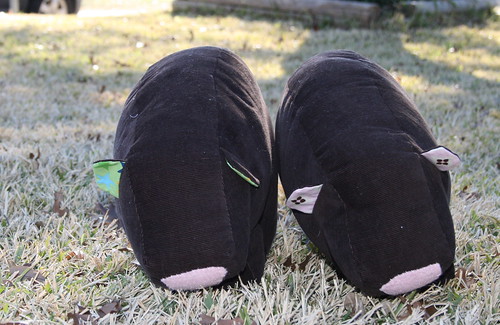
I was flipping through my sewing books, and saw the cute stuffed bears from One-Yard Wonders. I had some corduroy in my stash, and thought two little brown bears would be so cute. I used some green and blue scraps for Ben's bear's ears, and pink for Ellie's. Both have pink felt noses. I really enjoyed this pattern and I think the bears are adorable!

stuffed bears

I had purchased some of the Wee Woodland line when I was pregnant, and ended up not loving all of it, but I did use some of it to make a cute pillow for the glider. I really like these prints and colors.

patchwork pillow

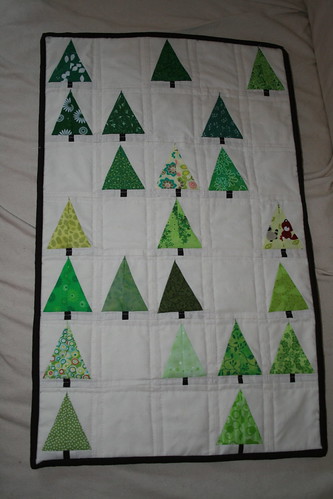
This last project has been on my 'someday' list for a long time. I loved the look of the little forest. When I decided on the woodland theme for the nursery, I knew I had to make this for the wall. This was the first 'complicated' quilt project I undertook. I knew I wanted each tree to be different, so I purchased some green fat quarters and dug through the stash. It took me a bit to understand why I didn't have a complete tree from the way I was cutting (the mystery of triangles!), but I did finally 'get' it. I used big pieces of leftover green for the backing and bound it with brown. I added some loops to hang it on the wall.

Little Forest Quilt

I really like these small additions to the nursery!

Tuesday, August 28, 2012

Nursery Stitching

I enjoy dabbling in embroidery from time to time. I knew I wanted some 'art' for the walls of the nursery, so I dug out some of my patterns, and chose some cute animals that went along with the woodland theme.

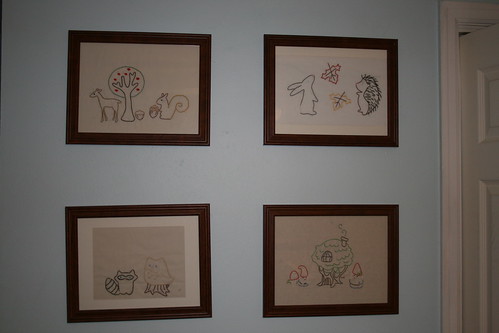
Raccoon and Owl Embroidery

These guys are from Doodle Stitching. I thought they looked cute together, and that the owl needed to be in a tree. :)

Bunny and Hedge Embroidery

More Doodle Stitching, with falling leaves!

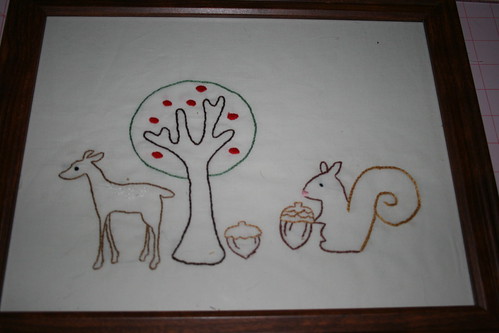
Deer and Squirrel embroidery

A little 'ensemble' from Doodle Stitching. Wish the tree was a bit bigger than the deer!

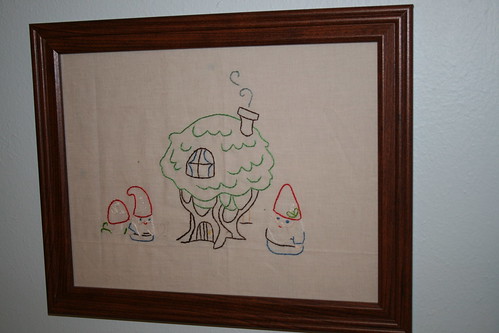
Gnome Home Embroidery

A a little gnome home completes the set. I love these guys!

Embroidery in Nursery

These hang on the wall above their bookcase. It's a short wall (entry hall on one side and bathroom door on the other), so they just fit very nicely!

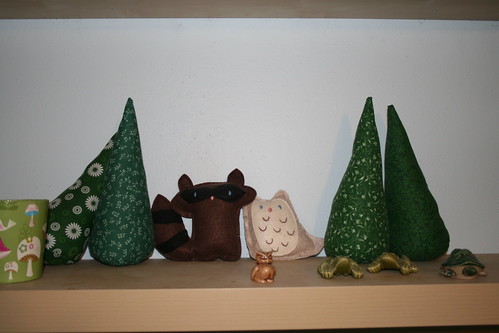
Nursery Shelf

I used the first Doodle Stitching book to stitch up this little raccoon and owl. I really liked the way they turned out! I moved the Christmas trees back to this shelf to make a little forest. :)

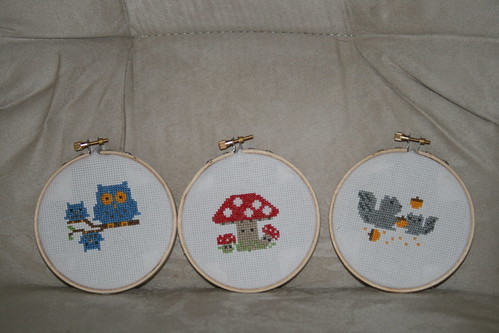
forest friends cross stitch

And I stitched up these guys as well. (Blogged here) They hang near the changing table.

I love that I was able to add some personality with stitching! I enjoy handwork, but don't do it very often because I'm so often knitting instead. I need to make more time for it!

Monday, August 27, 2012

Welcome to the Nursery!

When we found out we were having twins (gosh, almost two years ago now! Wow!), I was so excited to create handmade things for their nursery. We didn't do much for Samantha's nursery, so I really wanted to do this one up! Also, we were adding on to the house, so they were taking the former master bedroom.
I started by choosing a theme (I love a good theme!) - forest animals. Of course, I was about a year ahead of the trend, since there are so many cute woodland themed fabrics out now!
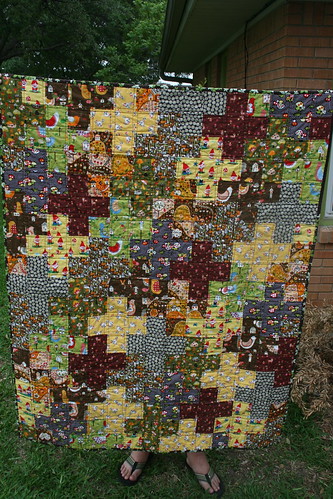
I made their quilts first, as I knew I would probably be uncomfortable sitting on the floor basting quilts when I was further along. I had picked up two cute fat quarter bundles in Austin at Stitch Lab previously that year. They happened to coordinate, so I decided to use them together in a "plus" design quilt for Ellie.
Plus quilt

I love this one - it is small and has such cute prints (gnomes! mushrooms!).

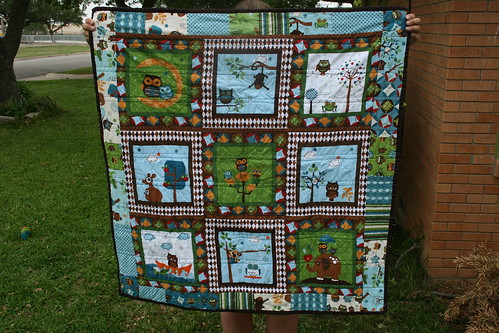
For Ben's quilt I wanted to use the Hooty Hoot line of fabric - Owls and Kangaroos! Crazy! I had picked up a panel of the fabric, and wanted to use it as well. I used the Road Trip Quilt pattern from Cluck Cluck Sew. I made it a bit larger than the pattern, as I had plenty of fabric.
Hooty Hoot quilt

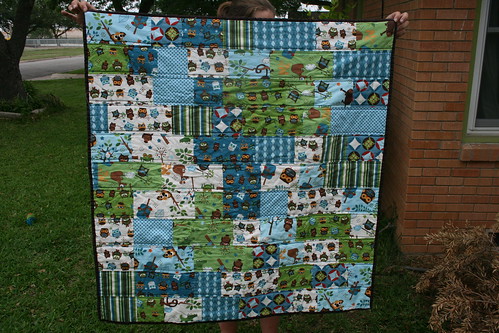
I used the panel and some leftover rectangles from the front for the backing. It is cute and reversible!

Back of Hooty Hoot quilt

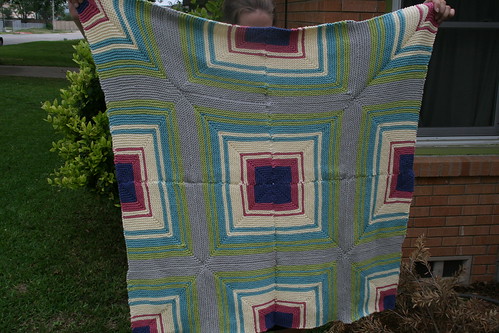
Of course, making them quilts wasn't enough for my crazy tendencies, I had to knit them blankets as well.

Mitered squares blanket

For Ben's blanket I used the Four Corners Baby Blanket, and five colors of Cotton Ease. Each corner is knit alone, then seamed and the border added. It was a nice, easy but interesting knit.

Patchwork blanket

For Ellie's blanket I usedthe Patchwork Blanket pattern from an older Nashua booklet. It was also easy, but seaming garter stitch is not my favorite! I do like the colors a lot in this one - also Cotton Ease.

Stop by each day this week to see more of the handmade items in their nursery!

Wednesday, August 22, 2012

WIP Wednesday: The Knitting Edition

I'm hijacking WIP Wednesday this week to show off what I'm knitting. I haven't got much going in the sewing department - a quilt that needs quilting, one that I'm in the midst of cutting and piecing (not very photogenic yet!), and some sewing projects I just cut last night for new dresses/tops for Samantha.

But I'm in the midst of several knitting projects (nothing new there!), and I haven't shared what I'm actually working on here on the blog in far too long. Y'all must think these knitting projects spring up completed like magic! :)


First up is Kindling, from last fall's Knitty. I'm knitting it for Samantha, in the 4T size in Knitpicks Stroll Sport. I think it's funny that the pattern in the picture is purple, and I'm knitting purple, because I'm trying to get away from using the modeled color. But she's had three pink sweaters in three years, so it was time for something different. I'm thinking about a grey sweater for next year. This was actually started last fall, but put aside when my wrist was injured, and then sat because the opposite cables were too much for my brain when the babies were still not sleeping through the night. But I pulled it out about a week ago, and I only have three cable rows left (on the front, still a few on the sleeves)! Then it's just back and forth for a while. I'm glad to get this to where I can work on it without looking at a chart - just in time for the craziness of school and all of our other activities starting!


This bundle of cable goodness is on it's way to becoming the Heirloom Aran Baby Sweater (rav link). I've loved this sweater since I started knitting (it was in one of the first knitting magazines I ever bought!). I started this last summer in Knitpicks Palette, but again, it was put aside. I restarted it in Rowan Yorkshire Tweed that I had bought many many years ago. I'm so glad I switched the yarn! The cables look SO much better in the Rowan yarn, because it is more tightly spun. I still have a lot to do on this project to have it done in time for winter, so I'm hoping this can become my nighttime TV knitting. It does seem to go quickly when I work on it, even though it is tiny yarn and needles. 


This is the Archie Vest (rav link) from Vintage Baby Knits. I'm using Knitpicks Comfy Fingering. Yum! I love this yarn, and the pattern is moving along pretty quickly. I started it this spring, and then it got put aside (I'm not sure why! I think I just forgot about it!). I modified it to knit in the round, so I don't have to knit colorwork back and forth. I have several inches done, so hopefully this will be done for the fall. This is my project to work on while the kids play outside - with cooler temperatures hopefully on the way, we will be spending more time outside and that means more knitting time for me! 


And this tiny project is the very beginning of the Neighborly Vest for Samantha in some lovely turquoise Cascade 220. I did the button band/neck band a long time ago, and just haven't gotten around to picking up stitches. I'm hoping to do that this week so I can really get started on this (most of it is just stockinette stitch in the round so it should go super fast), and it can be my soccer practice/ballet project. 


And finally this is my Tangled Yoke sweater. I started this sweater years ago, and I don't know why it is taking me so long to finish! I stopped at the yoke because of the cable when I was pregnant last year, but picked it up again a few months ago. The somewhat complicated cable, and the weight of the entire sweater really aggravate my wrist, but I want this to be finished! I'm gong to try to work on this a row at a time this fall. It probably is now too small in the bust post-baby, but maybe it will fit again someday! It is too pretty to give up on! 


Tuesday, August 21, 2012

Clothespin Bag: Tutorial

My grandmother passed away a few years ago. In the process of cleaning out her house, my mom has found some real treasures (handquilted quilts, great photographs, her old sewing machines), and some treasures only our family can appreciate (like the magnets from her fridge, and all of her sewing notions and buttons). One thing that my mom brought me was her old clothespin bag. It had seen better days when I received it, so it was no wonder that after a year and a half of daily use, it began to fall apart.

I have no idea what the original material was - it didn't feel heavy enough to be a home-dec weight fabric, and it felt synthetic. I had never seen a clothespin bag like this before, however, some searching finds that they are not that uncommon. I particularly like this style because it is so easy to get the pins in and out with the large opening.

I decided that it couldn't be that difficult to make a new bag for the frame, so I dug into my stash of home dec weight fabrics, and found this cute polka dot print (that I have made several tote bags out of as well). I measured the existing bag, and added a few inches to the bottom (I think I made it two inches longer). I also added an inch at the top to make it nice and wide for the opening of the metal circle. I measured the existing bag and added an inch for a seam allowance to the width of the bag. My bag measured 12" wide by


My bag frame is one circle, so I had to plan how to sew the bag onto the frame. First I sewed up the sides of the bag with right sides facing (I cut my bag in one large rectangle so I didn't have a bottom seam, but if you cut two pieces you will need to sew the bottom of the bag together in this step as well).


Then you'll fold down the top for the casing. I didn't worry about ironing or folding the edge under twice. It may fray a little, but this part of the bag is going to take much abuse. I folded my edge down one inch. I knew it would be tough to sew around that metal frame, so I wanted a wide hem.

I then placed the circle part of the frame inside the hem of the bag. I pinned down the hem, with the frame inside. Going very slowly, I stitched close to the bottom of the hem, being sure to keep the frame parts out of the way of the machine. You may want to use your zipper foot for this step, but I found that my hem was deep enough to keep the frame out of the way. I sewed each side separately, as the part of the frame that hangs on the line attaches to the circle part of the frame at each side. Clear as mud? :)

And voila! A new bag! I love my new bag - it is just a little bit bigger which is great for the number of pins I use when hanging little kids clothes (and the socks, oh the socks!). And an aside - I love hanging laundry on the line. I love the way it smells (like sunshine!), I love the few moments of silence I get when I go outside, and I love the feeling that I'm getting something for free by not using my dryer!
Go forth, and make clothespin bags!

Monday, August 20, 2012

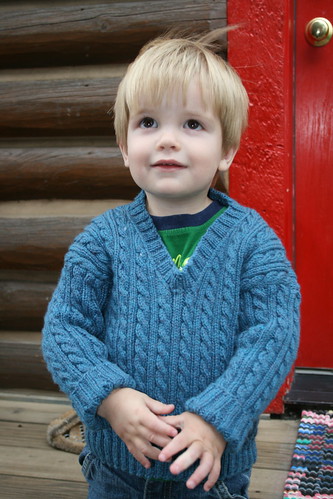
Hunter's Sweater

Last spring I asked my sister and brother-in-law to choose a sweater for me to knit for my nephew. They chose the Cable Sweater from Debbie Bliss' Simply Baby book. It is a lovely, classic, cabled sweater. I used Knitpicks Stroll Sport - I had used some Stroll for another project and really liked it - it was soft, and not too splitty. I think it will hold up well to wear.

Hunter's sweater

Unfortunately, since I hurt my wrist last fall I wasn't able to finish it in time for him to wear it last winter. But it was plenty big, so I saved it for this year. Of course, I ran out of yarn 20 rows before the bind off on the second sleeve. But a sweet Raveler saved the day with some leftovers she had, and the sweater is complete! It is still a bit big, so it should fit though the fall and winter. Such a great color on him too! He was very excited to put it on and willingly modeled for me, a sure way to win more handknit sweaters from his auntie!

Friday, August 17, 2012

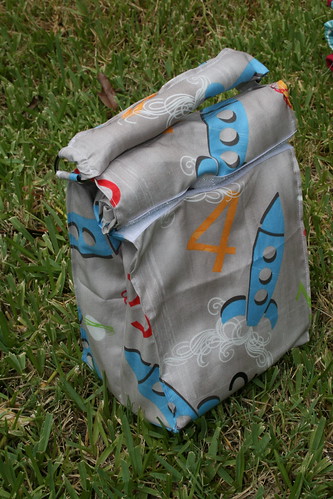
Back to School Week: Rocketship Lunchbox

For our last Back to School week post, I have my husband's new lunchbox to share with you! He's been asking for one for a while, and after I made Samantha one, he had to have a new one too. He searched all over for fabric that he liked, and settled on these rocketships and numbers. We chose Heather Bailey's Jack and JIll lunch bag pattern. He wanted it to be insulated, so I used insulbrite instead of regular interfacing, and his fabric was not laminated cotton.

IMG_6939

In the end, I don't love this project. The handle doesn't line up at the top of the lunchbag no matter how I fold down the top, and I put it exactly where the pattern specified. I also feel like there is too much top to the bag - it doesn't need to roll down that much! But he's OK with it, and hopefully it will serve it's purpose. I'm sad though that I probably won't use this pattern again - it's hard to buy something I'll only use once! Maybe I'll try it again with laminated cotton sometime.

IMG_6940

Thursday, August 16, 2012

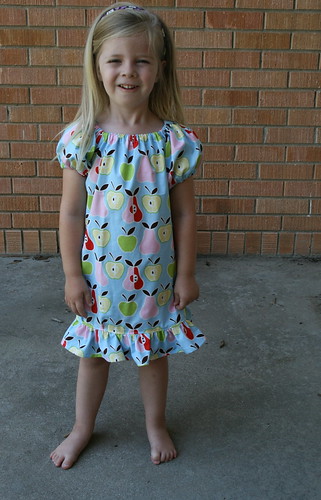
Back to School: Apples and Pears Dress

I knew I had to make Samantha a first day of school outfit. After all, I made her this one last year.

I had purchased this fabric a few years ago, and had been hoarding it (as I tend to do), for the perfect project. I didn't want to spend any more money this month, so I was glad I remembered that I had this in the stash.

Back to School Dress

Samantha insisted that Ellie have a matching dress, but I didn't make her model hers. I still need to make her matching bloomers too (we like to rip our diaper off if we can!).

I used this free pattern, which was fine. Since most of the dress is rectangles (you do cut a curve for the armhole), it was pretty straightforward. The only tricky part was the ruffle. I hadn't sewn a ruffle before, but I had read about it. The problem I had was that I followed their directions, which have you sew one long basting line around the ruffle fabric. Everything else I have read about ruffles says to sew two rows. I should have listened to my gut, as my thread broke, and I had to resew it, and while I was resewing my basting line, I ran out of bobbin! Grrr! But I sewed two lines on each side of the ruffle, and it was SO much easier. Ellie's ruffle came together very quickly, since I learned from Samantha's!

I'll use this pattern again - I think it would be cute with contrasting sleeves and ruffles!

Wednesday, August 15, 2012

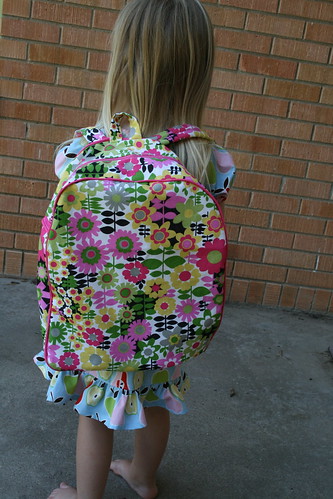
Back to School Week: Flower Backpack

Today I've got a big finish to share - Samantha's backpack! I had ordered her an adorable Skip:Hop backpack last year (the owl!) and loved it, but it doesn't fit a folder in it, so her work came home slightly bent all year. And I've heard that her teachers this year really expect the folder and lunchbox to fit inside. So we had to have a bigger backpack.

Backpack front

I had emailed Rae to make sure her pattern would be big enough, (and it is!) and took Samantha shopping for fabric. We lucked upon this cute fabric - 'girly' without being too much. (It is home-dec weight from Hobby Lobby).

Backpack back

This project gave me more that a few fits. I felt like I couldn't baste my piping close enough to the cord - this was my first time using piping, and I hope it gets easier! I also had trouble stitching my side panels  close enough to the zipper, and there is a small gap at the base of the zipper I'll close up by hand. (Next time I use the trick I learned from the lunchbox and buy a longer zipper and cut the bottom off so I don't have to worry about hitting the metal stopper!). I also misplaced my D rings, so had to use another ring, making my straps not adjustable. I found them though, so I may rip out the straps and sew in the D rings. I also wish I had used matching thread for the piping basting, as you can see my basting stitches - I can go back and rip them out if I want to.

Most of my troubles were doubting myself, so I think it will be easier the next time. I'm still deciding if I'll go back and line and interface it. It's a bit floppy, but I'm not too worried about that. I do think I'll make another one.

Tuesday, August 14, 2012

Back to School Week: Dino Lunchbox

Welcome back to back to school week! Today I'm showing off Samantha's new lunchbox.

I was inspired by Melanie's adorable lunchboxes, I had to make one for Samantha. Her lunchbox last year was ruined, so I had an excuse to make a new one. I used Erin's pattern and PUL from JoAnn's with Insulbrite for insulation.

Dino lunchbox

I have to stop and rave about this pattern - it is fantastic! So many great pictures. Just enough hand holding to make you feel like you can do it! I did make a mistake right out of the gate - I sewed my insulbrite to my lining fabric - not a terrible mistake, but I think the outside of the bag would be 'sturdier' if I had interfaced the correct fabric. I also used Melanie's mod to cut a square out to box the corners, so that I didn't have to try to line up those super bulky seams.

I was intimidated by the zipper (you fold part of it back, and I wasn't sure I was doing it right). But it was SO EASY! Seriously - the easiest zipper I've installed in anything. And I feel like I learned a few tricks for future zipper installations.

Dino lunchbox interior

I love the pocket, and was glad I included it. It is the perfect size for Samantha's icepack. I made my bag slightly deeper (on accident), but I can still stand Samantha's sippy cup inside it, so I am glad about that! I omitted the bottom insert, because of the insulbrite, it stands up well without it. I also used webbing for the handles so I didn't have to fuss with folding the pul. Luckily, I had a blue zipper the correct length, as I forgot to buy one when I got the rest of my supplies! Thank goodness for stash! The PUL for the interior was leftover from the diaper pail bags I made for my sister, sister-in-law and myself.

I highly, highly recommend this pattern! I am looking forward to making more lunchboxes for Ben and Ellie next year!

Monday, August 13, 2012

Back to School Week: Snack and Sandwich Bags

I have completed several 'back to school' projects recently, so I thought I'd do a little 'back to school' week of projects on the blog!

Today's project were new snack and sandwich bags. I had purchased some a few years back (before I was more confident in my sewing skills), and loved them. Sadly, they had been lost/ruined/eaten by the dog over the years, and we needed a few new sets. Since only daddy and Samantha are off to school this year, I only made a set for each of them.

Math sandwich bags

For Kent's set I used leftovers from his quilt (which needs to be blogged!). They won't be confused for anyone else's at school! :) He requested two sandwich size bags, since he likes 'lots of snacks' in his words. He also has a sandwich 'keeper' that is plastic that he uses, so these will be snack bags for him.

Hungry Caterpillar Sandwich and snack bag set

For Samantha's set I used the fabric we used for a tablecloth at the babies' first birthday party. I thought it would be fun to use them for something like this (and I have plenty left to make more sets when the babies go to school next year!). She got a large bag and two small bags.

Don't have your own sandwich and snack bags? Stop by my etsy shop and pick up a set! They're on sale this week!

Thursday, August 09, 2012

That's my name

My guild has asked us all to wear name tags to our meetings. Many members have lovely handmade/embroidered nametags. I have been wanting to learn how to piece letters, so I thought I would try (after all, my name only has four letters in it, how hard could it be?). I sat down during naptime one day (the day of the guild meeting, of course!)

Nametag

I just started sewing some scraps together with some Kona White. J wasn't too bad. E was a bit more complicated, and the n's were a disaster. And apparently I cannot judge size very well, as my nametag is the width of my chest. Not really ideal.

Maybe I'll invest in Word Play Quilts or buy Elizabeth Hartman's Refrigerator Magnets pattern. I would love to put people's names on the back of their quilts!

Monday, August 06, 2012

Coming soon

First, let me apologize for the crappy pictures-I took them in a hurry the night before we left town, so all you get is crummy lighting and bits of my messy sewing room in the background.

School is starting soon, and Samantha has to have a bigger backpack this year (it has to hold a folder and her lunchbox-last years was too small). Since I like a challenge (and am quite possibly crazy), I decided to make it. She helped pick out fabric-the flowered print is for the backpack, and I'm using Rae's toddler backpack pattern, with the mods for a larger size.

One of the dogs chewed up her lunchbox last year, and when I saw Melanie's adorable lunchboxes, I knew I had to make a lunchbox as well. I'm using Erin's pattern. I'm a little intimidated. The adorable dino fabric is for the lunchbox. We are seriously into dinos around here these days.

I'm also planning to make some snack and sandwich bags for her from the cute Eric Carle fabric we used for the babies' birthday.

Daddy has also requested his own set of bags, and today decided that he wants a new lunchbox too, so he's looking at patterns.

I'm also planning a new dress for back to school, so it looks like August will be a busy sewing month!

Thursday, August 02, 2012

Going for a ride in my car, car, car

We're off on a roadtrip for a family vacation. I'm excited that the 5 cousins will all get to play together for more than an hour or so, and I'm looking forward to lots of good beer, playing games and relaxing with family I don't get to see enough.

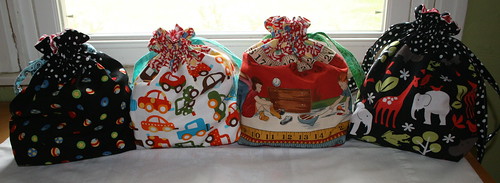
But packing for a family of five is tough. Packing to go somewhere were there are not amenities we are used to (like cribs and high chairs and TOYS!) is tougher. I have been worried about how to pack toys in a way that won't leave stuff all over the car, or lost in the rental house. I had joked to hubby about a week ago about how I should make drawstring bags to put the toys in. He looked at me like I was crazy (in all honesty, I was working on three quilts at once, and knitting class samples), and I shelved the idea. But as we got closer to packing time, I decided that we had to have them. I figure I'll also use them when we're hanging out at ballet and soccer practice this fall, so they are a good investment! (And when we go visit the grandparents for Thanksgiving in November!)

Toy bags

I used Jeni's amazing pattern and was able to whip up four of these during naptime. I deliberately used 'kid' fabrics from my stash, and even went so far as to use car fabric for toy cars and animal fabric for our collection of plastic animals. (I love being literal, and it helps the kids know how to clean up!).

Balls drawstring bag

I used red gingham (leftover from Samantha's farm party tablecloths) for the lining of all the bags (since I have yards of it!), and shopped the stash for the other fabrics. I love that I made something from 'nothing' since I already had all of these fabrics in my stash! I usually buy fabric with a specific plan for it, so it's nice to use up leftovers (and yes, some fabric changes purposes the longer it sits!).

Kids drawstring bag

These turned out the perfect size to pack just enough toys for our trip. I can't wait to make more! I think they would be great for 'wrapping' birthday and Christmas presents! And I could make them match the gift.....oh the wheels are turning! :)

Cars drawstring bag

Jeni's pattern is free, but she has an additional pattern for sale, that features many different sizes.

Animal drawstring bag