Tuesday, May 22, 2012

A Very Hungry Caterpillar Party part 3

I have one more decoration I forgot to share with you in part one!  I had seen this idea on pinterest, but here is the original link. I made our caterpillars a bit smaller, since we don't have a ton of wall space, and needed to display two!  Hubby used his die-cutter at work to cut out circles for me, and then I found a smaller circle to trace over each picture to cut out (I had all my pictures printed at Shutterfly when they had a free 100 print special - I only had to pay shipping, which was almost as much as it would have cost to have them printed at CVS for $.10/each, but at least I didn't have to leave the house! :). We used their monthly pictures, and I wrote how old they were under each picture.


We were so low on available wall space, I ended up using the entry-hall closet door! They were adorable, and may still be hanging up. ;)

I had seen lots of blog posts about serving the food from the book for the party, and I just couldn't resist the idea!  I wanted to make some kind of 'sign' for the food, so that people would 'get' that it was the food the caterpillar ate. There are several food signs available on etsy that you can purchase and print, but no one had all of the food signs for (what I thought) was a decent price. And since we're a one-income family, I wanted to save as much $$ as I could! So we copied the pages from the book that show the food on a color copier (this is allowed for personal use!), and I cut them out and mounted them on green construction paper, and wrote what they were above the picture.

We taped them to craft sticks, and then were able to tape and/or stick the sticks into the serving dishes.


Instead of sausage we served hot dogs, which is our standard party food! 

We had tea, milk, water and lemonade to drink and I couldn't resist butterfly cups, napkins and plates (also from Dollar Tree).

To 'pretty' up the food area I cut a yard of fabric that featured the food from the book in half, and taped it to our buffet. (I am hoping to give it a second life by sewing us some much needed snack and sandwich bags with it!)

Hubby worked his cake magic (his usual duty for any party!), and we had vanilla and chocolate cupcakes with green frosting for the caterpillar's body and a red frosted chocolate cake for his head.
We didn't have a tray big enough, so we just set him out on the table!

Hm, what's this?


Thank goodness buttercream frosting comes right off!

Monday, May 21, 2012

Giveaway Day part 2!

Welcome to Giveaway Day! Hosted by Sew Mama Sew! each year, this event celebrates those of us who create! Anyone with a blog is welcome to join in, and give away an item for crafting (specifically related to sewing), or a handmade item. Today I'm giving away two items!


This item is a set of five reusable cloth napkins and a travel sized placemat! My daughter has lunch at school, and at the beginning of the year they asked us to send two paper towels each day in her lunch - one for a placemat and one for a napkin. I couldn't bear the thought of wasting all those paper towels, so I made her a set of reusable cloth napkins, and a placemat made of laminated cotton! We wash her napkins and wipe down her placemat as needed, and they go back in her lunchbox for the next day - she loves them and I love not throwing away all those paper towels! 


You can win your own set today - perfect for your child or for yourself! The laminated cotton placemat is bpa free and has a decorative serged edge. It should be wiped clean with a damp cloth and laid flat to dry. The set of five napkins (one for each day of the work week!) is made of cotton quilting fabric and is double sized and features top-stitching for a professional finish and look. 


To win, leave me a comment telling me your favorite handmade item to give as a gift! Please leave your email address in your comment to make sure I can contact you! Thanks for stopping by! Giveaway closes at 5pm PST May 25. I'll update this post with the winner by Sunday May 27!


***UPDATE** Brooke is the winner! Congrats Brooke! Thanks to everyone for stopping by!
If you didn't win, you can purchase your own set of cloth napkins in my etsy store. I plan on adding the placemats soon!

Giveaway Day!

Welcome to Giveaway Day! Hosted by Sew Mama Sew! each year, this event celebrates those of us who create! Anyone with a blog is welcome to join in, and give away an item for crafting (specifically related to sewing), or a handmade item. Today I'm giving away two items!


The first item is for that special little kiddo in your life. My daughter loves to cook in her kitchen and feed us and her babies her creations. She was always asking me for napkins and placemats for her little table, so I decided to make her some! And now you can win a set!


This is a set of four placemats and four napkins. They are sized small for baby doll and toddler use! :) The placemats measure 9x12" and the napkins are 4x8".  They are made of two layers of cotton quilting fabric and feature serged edges for durability! The fabric is an adorable vintage-look fabric from Debbie Mumm and features stuffed toy animals.

To win, please leave me a comment telling me your favorite handmade item to give to a child! Please leave your email address in your comment to make sure I can contact you! Thanks for stopping by! Giveaway closes at 5pm PST May 25. I'll update this post with the winner by Sunday May 27!


***UPDATED*** The winner is SandyandCosmo! Please email me your address and I'll send your gift out! Thanks to everyone for stopping by!


If you didn't win you can purchase your own set in my etsy store

*Please note, that the table, chairs, dolls and tea set are not included in the giveaway!*

Saturday, May 19, 2012

Blogger's Quilt Festival

I am excited that I not only finished one of my favorite quilts in time to take to quilt guild last night, but just in time for the Blogger's Quilt Festival!

Made in Remix

When I first saw the Made in Cherry quilt pattern (free!), I just loved it. I love stars, and hadn't made a star quilt yet, and loved this one giant star! I wanted to make it coordinate with the colors of our living room, and make it modern. When we added on last year we painted the new living room a pale grey. One of my favorite fabrics to include in a quilt is Kona Coal, so I wanted something that would coordinate with that. Hubby is not a big fan of floral prints, so something geometric would be ideal. And since I don't often get to the LQS with all three kids, a bundle of coordinating fabrics would be perfect! I love Ann Kelle's prints, and her Remix fabrics are so modern and fresh. I purchased two bundles on etsy, and started cutting!

Made in Remix closeup of star interior

I laid out my rows in advance, to try to eliminate having prints touch. Unfortunately, I didn't keep track of the top and bottom of my quilt after I had my rows joined, so when I added the star points I had some matching. Not a big deal though! (But a good excuse to finally create a design wall of some sort!)

Corner quilting

I quilted 1/4" on each side of the seam within the star. Then I copied Megan and quilted my lines within the solids 1/2" apart. I just eyeballed them, so they are not perfect, but I love the way it looks! I used white thread for the interior of the star and grey for within the solids. Quilting the straight lines took a while, but was actually pretty easy since I wasn't wrestling the entire quilt through the machine.

Between the points quilting

It took about an hour to quilt each solid section and a few hours for the interior of the star. One of the longest times it's taken me to quilt a quilt (but it is a pretty big quilt - finishing at 80"x80"). I did it all on my home machine!

Made in Remix back

For the backing I pulled some black/white/grey fabrics from my stash and pieced them together. I really like it!

I used an aqua fabric with tiny black scattered dots for the binding (from JoAnn's). I'm trying to branch out on my binding - I typically use a fabric from the front, or fabric that matches the backing or a neutral solid. I really like how the binding matches, but isn't a featured print. I also like how it highlights the aqua prints within the star and pulls it out a bit.

Love this quilt! Now if it would just cool off so I could use it! Probably will be waiting a while for that!

Friday, May 18, 2012

A Very Hungry Caterpillar Birthday part 2

Even though B&E were only turning one (and we had 3 other guests under 15 months), we were having 7 guests ages 2-8. In the past, our playroom has been pretty destroyed after a party, so in an effort to curb the inevitable destruction, I opted to have lots of crafts available. And there are so many things you can do along a caterpillar/butterfly theme!


The craft table is all set up!

I had been saving paper egg cartons for a while, and hubby cut them apart for me (cut the lids off, then cut the two rows of spaces apart). I was just going to use them like that, but then I remembered that I had some left over green spray paint, so I took them all outside and they got a simple coat of green (not fully covered as I ran out of spray paint!)
I put out pompoms, googley eyes, and foam insect/flower shapes for decorating. 

Samantha's finished caterpillar (those pipe cleaners are it's legs)

We also did one of my favorite pre-school days crafts - making butterflies! We used old-style clothespins (I always get mine at the dollar store) that I also spray painted green, and round coffee filters (also at the dollar store!). The kids drew on faces, we used pipe cleaners for antennas and they colored their coffee filters for wings. (We wrote their names on the bodies to help ID whose was whose!)

Samantha's butterfly

I had printed simple coloring sheets from Eric Carle's website, that we had out as an arrival activity. These were way more popular than I had expected! Just goes to show that I shouldn't overestimate the value of simplicity! (I should do a post on our crayon caddy too!)


We planned a nature 'scavenger hunt.' I made a simple table in Pages (my 'Word' software), and found clip art images to fill in. I put in a bunch of easy things, so that the kids would feel successful. One thing I didn't include was a lizard - we see them pretty often, but I didn't want to include one and have the kids get upset if we didn't see one. So of course we not only saw one, but were able to catch it! 


I have a bunch of clipboards from when I was teaching, so they were great for this. If you don't have any, I get mine from the Dollar Tree at back to school time. 


I put them out in a basket by the door, so the kids could grab them on their way out.


Our 'big' craft/activity was using freezer paper stencils to make our own shirts. I thought this would be a nicer 'favor' than a bunch of little stuff, which I what I have done in the past.  This part kept me pretty busy for a while, since I had to man the iron. Each kiddo chose an insect (I had ladybugs, dragonflies, butterflies, and worms - I already had traced them and cut them out of freezer paper prior to the party). I purchased a bunch of inexpensive t-shirts when Michael's and JoAnn's had them on sale (4 for $10). However, they don't make them smaller than a 6-8 size, so I purchased 3 toddler sizes at JoAnn's (I used coupons to save $$). Each kiddo got to choose the color of their shirt as well. 


I waited until paint was on sale, so I could get a few colors without having to save a million coupons. I think I ended up with seven colors. (All good 'insect/outside' colors). I cut two leftover pizza boxes into squares to put in between the front and back of the shirts so that the paint wouldn't bleed (I usually fold up paper, but since I was doing so many I didn't want to waste the paper. The cardboard worked great - and I can reuse them now!).  

I used sponge brushes, since they are not too messy, and put the paint in old yogurt containers (one of my favorite things to save! They have millions of uses!). The kids did a good job! The three year olds needed some adult help but the older kids did well independently. Since the paint was still wet when they left, I don't have a picture of anyone's shirt but Samantha's. 

I have heard from almost everyone that the shirts are very popular! I'm glad we did something like this - it showed me that it wasn't too hard to manage at a party, and the kids really seemed to enjoy the process and the finished product! Not bad for under $3/favor!

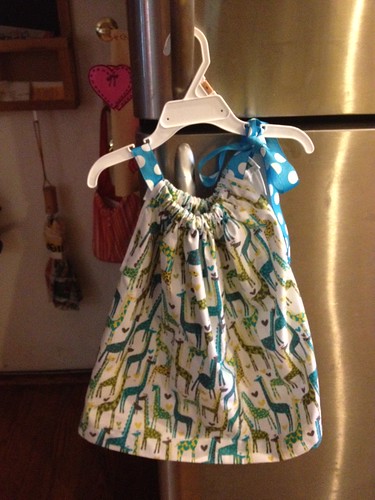
Since we had some littles, and their parents would be busy watching them and/or their older siblings, I didn't want them to worry about painting something. So I made them shirts. 

Caterpillar birthday onesies

I used some Very Hungry Caterpillar fabric found here, fussy cut out some caterpillars, used Steam-a-Seam to stick them to onesies and stitched around the outside. Simple and cute! 

Whew! We did a lot! I'm tired just remembering all the things we did!

Thursday, May 17, 2012

A Very Hungry Caterpillar Birthday Part 1

Ben & Ellie turned one two weeks ago, and now that we've all recovered, I wanted to share what I did for their birthday. I did a lot (no surprise, really!), so I'll spread it out over several posts. Today - invitations and decorations.

I saw this idea a while back and loved it. However, since I had to mail our invitations, I opted not to use glass jars. Small peanut butter jars seemed ideal! My friend and neighbor helped me save up enough small jars (we usually use large jars, but her peanut butter only comes in this small size!). We washed them throughly and use sticky removal stuff to get the labels off. It took a while, but was worth it! (Special thanks to hubby for scrubbing the more stubborn labels!).


I didn't use the pottery barn template - instead I printed a simple leaf (I searched for a leaf coloring page - this is a good way to find outlines of things!), and traced it onto cardstock and cut them out. I wrote out the information and used a hole punch at the top to look like the caterpillar had munched it.


I used green pompoms for the caterpillar body, and red for the heads. I had a hard time finding a bag of pompoms that had enough green ones, so I ended up buying a Christmas bag! Thank goodness JoAnn's has that stuff out year round! (Plus we now are ready for Christmas crafts!). I opted not to do eyes, but did glue on bits of pipe cleaner for antennas.

Stick a leaf and a caterpillar into each jar, and voila! They weighed almost nothing, so they weren't expensive to mail, which was nice!

Sorry I don't have a better picture - just remembered to snap this one before we sent them all out!

We did simple decorations. I found these butterfly dangles at Dollar Tree and grabbed them.

And we made a caterpillar from balloons.


I also made a birthday banner for them, but I'll share that another day, as I wrote a tutorial on it for making your own! 

More to come - activities, food and clothing! 


Wednesday, May 09, 2012

Last minute teacher gifts

It is midway through teacher appreciation week, but there is still time to make a handmade gift!

I've whipped up a few things, and have another planned.

Coasters

Coasters are a great easy gift. I used Jenny B. Harris' criss cross coaster pattern. I modified it to add batting to give it some absorbency and 'heft.' These were super easy and took almost no time!

Coffee cozy

I also made some coffee cup cozys. There are a million free patterns/tutorials for these out there. I'd love to try some patchwork ones too - these by Jeni B. are especially cute!

If you don't feel up to making your own, I have some listed for sale in my shop, and would be happy to make you a custom order for that special person in your life!

I am making some lanyards for the teachers as well - I plan to use some leftover cute fabric that has pencils and scissors on it. Took me a while to hunt down swivel clips (Joanns was the only store that had them), but I think they will be really cute when they are done!

If you don't have time to make something this week, maybe make something for the end of the year for them? As a teacher, I know that gifts from the heart (and hands!) are the best ones! :)

Wednesday, May 02, 2012

WIP Wednesday

I basted this quilt many weeks ago but it has gotten shoved aside in favor of finishing things for the birthday party (full report to come!). I am hoping to quilt it this week and maybe even get it bound!

Still haven't made any progress on the two big quilts. Need to!

Linking up with Lee at Freshly Pieced

Tuesday, April 24, 2012

KCWC, sort of

So this week is the spring Kid's Clothing Week Challenge (where you spend at least one hour a day sewing clothes for your kiddos). I am not participating this week, because I am prepping for my wee ones first birthday party on Saturday. But I have been sewing some spring clothes, so I'll share those as I can this week.

dress3

I recently made this sweet little pillowcase dress for one of my sister's friend's little girls. They are big into giraffes, and I had this adorable giraffe print. I went with a pillowcase dress as it is easy to 'fit' when you can't try it on the kiddo in question and because it should fit for a long time (as a tunic or top when she's older). I used a cute blue ribbon with white polka dots (which is not trimmed in these pictures as I was trying it on Ellie to see how long to make it).

dress1

I hope she loves it!

Monday, April 23, 2012

Hey, that's me!

The two quilt tops I took to my new quilt guild were featured on their blog today! Check it out!

I have only been to two meetings, but it is nice to get to hang out with other like-minded folks for a few hours each month! I enjoy getting inspiration from real-life people, as it seems much of my quilting and sewing inspiration and communication comes from my internet friends (and those I blog-stalk! :)

Friday, April 20, 2012

Festival of Half Square Triangles, Part 2

The other half square triangle quilt I've made recently that I really like is another holiday quilt. I purchased quarter yards of all (?) of one of Riley Blake's holiday lines way back in 2008. (I also don't know the name of this line.) I loved how cute the prints were and thought they would make a great Winter quilt for one of my kids. (Well, I only had one kid at the time!) *UPDATE* Thanks to Threadbias, I know these prints are from the Be Merry line! Yay for the internet!

This was the first quilt that I actually calculated how big of a quilt I could make with the amount of fabric I had. I knew I wanted to do zig zags, and I wanted some sort of color pattern. I actually drew out the pattern and did the math for all this on the plane on the way home from visiting my sister and her new baby in the summer of 2010. I cut all the fabric that summer, and marked my sewing lines, and then it sat while I worked on gift quilts that fall and winter, and then massive amounts of baby knits and quilts the following spring. And this summer when I wanted to sew, but didn't want to think too hard, I pulled out the squares and got to sewing. But it wasn't a priority when I had other gifts to work on, so when everything else was done for Christmas, I pulled out those squares and joined them into rows and was able to get it finished in time for Christmas gifting.

zig zag quilt

The only thing I wish I had done differently was make all those stripes go the same direction! :) But it fits great on Samantha's bed and I really like how it turned out. I quilted on either side of each zig zag line, which was a bit of a pain in the butt, but again, I like the way it looks. I also used light grey thread, which was a bit unusual for me (usually I use white, but every once in a while I'll grab a non-white color for quilting). I did a scrappy binding, as I was trying to avoid another trip to the store the week before Christmas. :)


Thursday, April 19, 2012

Festival of Half Square Triangles, Part 1

I have made many quilts from half square triangles over the past few years I have been quilting. When I saw Megan's festival of Half Square Triangles, I knew this was up my alley! However, since I have been working like a madwoman to get ready for the babies' birthday party and to finish their birthday quilts (neither of which have half square triangles), I jumped in the not-so-wayback-machine to bring you two of my most recent favorites. (one today, one tomorrow)

A while back I made a Mary Englebreit quilt for my mom, who loves all things ME (I'll have to share that quilt sometime soon). While I was working on it I had a few squares leftover here and there. I pulled some of those aside, picking out green and red ones. I had also added in some squares from two of her Christmas lines, and I left out the ones that were uber holiday-ish. I had seen Rita make a quilt where she used prints for one side of the square, and a solid linen for the other. I love the way this looked! I used a solid off-white Kona (sorry, I don't know the color name) for mine.

Half Square Triangle

It is a good lap size, and holiday-ish without screaming CHRISTMAS!!! I really enjoy the print/solid combination and look forward to more iterations of that!

close up half square triangle quilt

I quilted straight lines on either side of the diagonal lines. I really like quilting like this - I feel like it gives more attention to the fabrics than the quilting.

I hope it is a welcome addition to my mom's holiday decorations! :)


Wednesday, April 04, 2012

WIP Wednesday

I'm linking up to Lee's WIP Wednesday for the first time today. I've got several quilts in progress, which is unlike me!

My big quilt for our bed is waiting for me to decide if it needs a border. What do you all think?


And this big one is Sarah Feike's Made in Cherry quilt. It was just finished today-now to decide on a backing!


I whipped up this quick little hourglass quilt for something springy. I just love the colors in this one! Now to decide on a backing for it too!

I have all the blocks made for Ellie's quilt, they just need to be ironed and trimmed. And I've started joining the tiny squares for Ben's quilt as well. More on them later!

Friday, March 30, 2012

I Spy Quilts

One of my mom's good friends is a long-time quilter. Mom talked to her about me starting quilting and I told her that I was looking for some scraps to make i-spy quilts. She was super generous and gave me a big bag of pre-cut squares! I decided to make mine simple patchwork (these were some of the first quilts I made, so I didn't want them to be too complicated!). I wanted to make two that first Christmas, so I chose 64 squares for the first quilt and 70 for the second. I tried to not repeat themes/animals/etc.

I Spy quilt 2

I added a red border, backed them with red cotton and bound them. I quilted in the ditch on these to not interfere with the pictures.

I Spy quilt 1

This past Christmas I made another for my nephew. This one measures 10x8 squares and doesn't have a border. My stash of gifted fabrics was low (after two other quilts!), so I used a bunch of my scraps.

I spy quilt

For this quilt I used fold-over binding. I quilted 1/4" on each side of each seam and when I trimmed the quilt I left about 1.5" of backing around each side. I folded the edge in and ironed a crease. Then I sewed the binding down very close to the edge on the front of the quilt. It worked pretty well!

I really enjoy making these, but I'm going to need to build back up my stash of cute fabrics - it is seriously low!