Friday, January 08, 2016
I've moved!
I won't be updating this site. All of it's content, and new content, can be found at www.mommysew.com. Please stop by!
Monday, December 08, 2014
Giveaway Day!
It is one of my favorite times of year - Giveaway Day hosted by Sew Mama Sew! This round I am giving away a $20 credit to my Etsy store! Choose from any in-stock item(s) - perfect for stocking stuffers, secret santas or a gift for yourself! :)
Thanks for stopping by! Leave a comment to enter and make sure to leave your email address!


EDITED TO ADD: GIVEAWAY CLOSED AT MIDNIGHT CST 12/12/14. WINNER IS atabanana29!
Thanks for stopping by! Leave a comment to enter and make sure to leave your email address!
EDITED TO ADD: GIVEAWAY CLOSED AT MIDNIGHT CST 12/12/14. WINNER IS atabanana29!
Wednesday, October 29, 2014
Blogger's Quilt Festival: Original Design
I am so excited that it is Blogger's Quilt Festival time again! I look forward to this every year and love looking at all the wonderful entries! I am very excited this fall that there are new categories for modern quilts and original design.
This is my entry for original design. I made this for my quild's "put a goose on it" challenge and I really love the way it came out! This is one of my favorite quilts I've made this year. I echoed the flying geese V formation with my quilting, and I think it came out so well!
If you're so inclined, you can vote for my quilt here!
Blogger's Quilt Festival: Modern Quilt
I am so excited that it is Blogger's Quilt Festival time again! I look forward to this every year and love looking at all the wonderful entries! I am very excited this fall that there are new categories for modern quilts and original design.
This is my entry for modern quilting. I love this quilt, I love the quilting and I love the colors. It is one of my favorites!
It doesn't hurt that I also love that I got to take pictures of it in the snow! :)
If you're so inclined, you can vote for my quilt here!


This is my entry for modern quilting. I love this quilt, I love the quilting and I love the colors. It is one of my favorites!
It doesn't hurt that I also love that I got to take pictures of it in the snow! :)
If you're so inclined, you can vote for my quilt here!
Tuesday, October 14, 2014
Chopsticks in Cascade for Quilt Market

I was so honored and excited to be selected by Jessica Levitt, to make something with her new line of fabric for her booth at Quilt Market!

Her new line is called Cascade, and is distributed through Windham Fabrics. The line features some large focal prints, and a variety of medium and small prints. My favorites are the raindrops, and the prints that look like falling rain - that one is a great blender!


I also made the Rock Candy Table Topper, and the Seaside Table Runner, both by Julie Herman as well. I have to say, I'm not one keen on having a million rulers, but Julie's rulers are awesome! I cannot wait to use them for other projects! Both of these use the Sidekick Ruler, which is super easy to use, the lines are easy to see, and Julie's directions are very clear.


I quilted both of these myself, and I was really pleased at how well they turned out!
All of these lovely pictures are courtesy of Jessica - aren't those with the quilt by the waterfall amazing?
Windham Fabrics and Jessica are doing a blog hop this week to show off all of the projects Jessica and others made to show off her new line.
Here is the blog tour schedule:
Monday October 13th - Jessica Levitt - Juicy Bits / Windham Fabrics
You can also sneak a peak at everything in the awesome Look Book that Windham and Jessica put together.
As part of the blog hop, Windham is generously giving away a fat quarter bundle of Cascade at each stop! To enter, please leave me a comment telling me what you are most looking forward to sewing next, or what line of fabric you can't wait to see! Please make sure you leave your email address if you are a no-reply comment blogger (if you aren't sure, it is safer to leave it!) so I can contact you if you win!
GIVEAWAY CLOSED! The winner is Sarah - Sarah I've sent you an email! Congrats!
GIVEAWAY CLOSED! The winner is Sarah - Sarah I've sent you an email! Congrats!
Thanks for following along!
Sunday, August 10, 2014
Greek Plus Puss Quilt

I am so pleased to share this quilt with you today! A few weeks ago, Rossie at Fresh Modern Quilts asked for pattern testers for her new quilt design. I was lucky to be accepted, and I got started right away.

I ended up switching the low volume fabrics into the plus shape instead of using them for the background - I love the different look it gives! I used an assortment of solids from my stash for the puss in the corner blocks. All of the background fabrics are black and grey, and I love the pop of color from those solids! The pattern is well written, and very straightforward. The quilt came together very quickly once I had everything cut out!

I backed the quilt with Kona Raisin, and used the same great silver and white stripe for the binding that I used on my woven quilt. I quilted it using diagonal lines through each section of the block.

Samantha (my oldest) keeps telling me how beautiful this quilt is, and how she wants a quilt like this for her bed. :)
Best part? Rossie gave me a copy of the pattern to give away! All you have to do is leave a comment, and if you feel like it, let me know what quilt you're working on right now - I love new inspiration and ideas! Comments close Thursday at midnight CDT and I'll choose a winner then! Please make sure you leave your email address if you are a no-reply blogger commenter, otherwise I can't reach you! I will also update this post on Friday with the winner, so check back!
**Edited to add** Trish - you are the winner of the pattern! Thanks for the comments everyone!
Sunday, July 20, 2014
Sewvivor - knitnlit

Hi and welcome if you are visiting via Sewvivor! I have decided to throw my hat into the ring, and 'audition' for the Sewvivor: quilted edition! :)
I had a very difficult time trying to decide what quilt to enter for this competition, and I finally chose this one I just finished up this week!

I am so very very pleased with the way this one came out - it was many many hours of piecing, cutting and pressing!
The pattern is Simply Woven from the Moda Bake Shop, and I had a good time picking some of my favorite fabrics to use in it.

I did some simple straight line quilting (my favorite!) and I backed it with some of my favorite DS prints, and used this great grey and white striped binding. This one finished at twin size, and I think I will put it away to save for one of my girls when they are a little older. I can't bear to part with it!

Crossing my fingers and toes I'm one of the 16 selected! How fun would that be??
Wednesday, May 21, 2014
Blogger's Quilt Festival: Large Quilts - Swoon!
Hi! Welcome if you are visiting from Blogger's Quilt Festival! I am so excited to share this recent finish - it is one of my favorites!
I have long wanted to make this pattern, and I purchased a FQ bundle of Denyse Schmidt's Florence line with some birthday money last summer. Finally, after the holidays were over, I had time to cut into this loveliness!
I used Kona Coal for the background, and I really like it - I think it compliments the colors of the DS fabric very well.
I am so happy to have this on my bed!
Tuesday, May 20, 2014
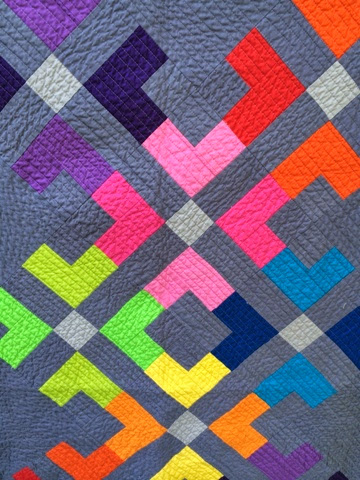
Blogger's Quilt Festival: ROYGBIV Quilts - Less is More
Hi! Welcome if you are visiting from Blogger's Quilt Festival! I am so excited to share this quilt with you today - it is one of my new favorites!
I finished this quilt earlier this spring for my quilt guild's solids challenge. The pattern is Less is More by Elizabeth Dackson, available in her book, Becoming a Confident Quilter.
I changed it up a tiny bit, but having the center of each block be one color, instead of a shade of the other colors in the blocks. The light grey is Kona Ash, and the dark grey is Kona Steel. I used a FQ bundle of Kona solids for the blocks - I really love the way it looks!
I finished up the binding on this on our drive to Indiana this March, and it snowed while we were there, so I was able to take my first 'quilt in the snow' pictures! :)
Wednesday, May 14, 2014
Beyond Neutral
I am so excited to finally be able to share this with you! Last spring I sewed up a sample for John Adam's new book Beyond Neutral. Well, the book is out, and I can finally show you what I made!
I can't wait to see all of the other patterns in the book - from the sneak peaks I've seen, they look awesome! See more peeks on John's blog!
I can't wait to see all of the other patterns in the book - from the sneak peaks I've seen, they look awesome! See more peeks on John's blog!
Tuesday, May 13, 2014
Alder Skirt pattern testing
I was so fortunate to be able to test the new alder skirt (for girls) for Rachael at Imagine Gnats.


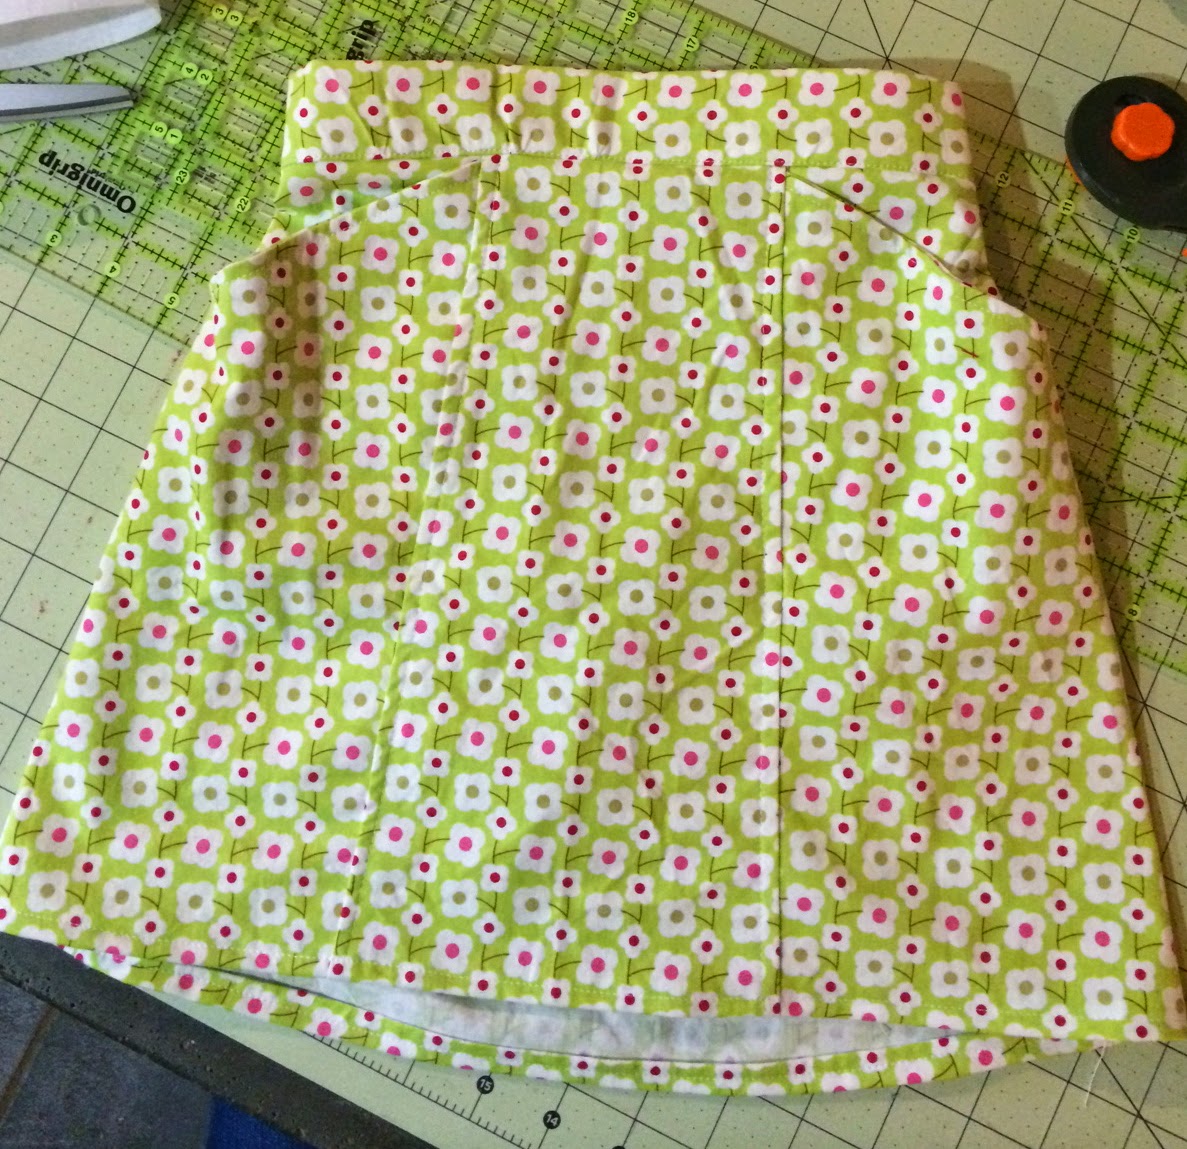


Plus pockets! My kids are obsessed with pockets, so this is definitely a winner in their book!
I encourage you to pop over to Rachael's shop and pick up your own copy - there is even a pattern sized for women! I'm excited to make one for myself too!
This is such a cute, basic skirt pattern - great for beginners!
I really love the way it came out, and I can't wait to make some more - I think this will be a great option for school skirts - cute, flattering, and just the right length.
Plus pockets! My kids are obsessed with pockets, so this is definitely a winner in their book!
I encourage you to pop over to Rachael's shop and pick up your own copy - there is even a pattern sized for women! I'm excited to make one for myself too!
Subscribe to:
Posts (Atom)