Friday, March 30, 2012

I Spy Quilts

One of my mom's good friends is a long-time quilter. Mom talked to her about me starting quilting and I told her that I was looking for some scraps to make i-spy quilts. She was super generous and gave me a big bag of pre-cut squares! I decided to make mine simple patchwork (these were some of the first quilts I made, so I didn't want them to be too complicated!). I wanted to make two that first Christmas, so I chose 64 squares for the first quilt and 70 for the second. I tried to not repeat themes/animals/etc.

I Spy quilt 2

I added a red border, backed them with red cotton and bound them. I quilted in the ditch on these to not interfere with the pictures.

I Spy quilt 1

This past Christmas I made another for my nephew. This one measures 10x8 squares and doesn't have a border. My stash of gifted fabrics was low (after two other quilts!), so I used a bunch of my scraps.

I spy quilt

For this quilt I used fold-over binding. I quilted 1/4" on each side of each seam and when I trimmed the quilt I left about 1.5" of backing around each side. I folded the edge in and ironed a crease. Then I sewed the binding down very close to the edge on the front of the quilt. It worked pretty well!

I really enjoy making these, but I'm going to need to build back up my stash of cute fabrics - it is seriously low!

Wednesday, March 28, 2012

Baby Pants

When I was on my 'make the kid's clothes' kick back in the fall, I knew I wanted to make some clothes for Ben. Being our first boy he didn't have any hand-me-downs (though we did get some lovely things from my sister and neighbor, who both have boys). My sister-in-law had made the kiddos some pants when they were tiny, and I loved them. Some research turned up that they were the Quick-Change Trousers from Handmade Beginnings.

Penguin Pants Back

I went through some of my existing stash and paired up cute fabrics. I did purchase a few prints, but used mostly stash.

Cowboy Pants Back

I LOVE them. They are great for winter (two layers of fabric make them nice and warm), and the cute little panel on the top of the back mean that there is no confusion about which is the back and front.

Shark Pants Back
Pirate Pants Back

He even got a special Halloween pair!

Candy Corn Pants Back

These might be my favorite pair. Robot Dinos!

Dino Pants Back
Robot Pants Back

And this pair uses some of my oldest stash (the elephants) and a cute stripe!

Stripe Pants Back
Elephant Pants Back

I loved making these - they were super simple and so cute! I'm hoping that they will be long enough for him to wear next fall/winter to wear uncuffed. I highly recommend this pattern!

Monday, March 26, 2012

Flat dolls

I like to peek in at the Moda Bake Shop every once in a while. They sometimes have cute, simple projects that appeal to me. I saw these and loved them. I LOVED paper dolls when I was little, but didn't think Samantha was old enough to handle them without tearing the clothes. These were the perfect solution!

flat dolls and wardrobe

I had a REALLY good time going through my scrap bin and finding pieces that were big enough to make clothes out of. I eventually had to stop myself, or the dolls would have a bigger wardrobe than I did!

The most 'difficult' part was having enough velcro! I had to make two trips to JoAnns because I kept underestimating how much velcro I would use! (And I really need to find a project that uses the soft side of the velcro, because I now have a TON of it!).

 flat dolls wardrobe

None of the shoes made it into these pictures, but they do have shoes! My wonderful crafty friends helped me cut out all the clothes, since cutting large layers really hurt my hand. I have extra batting and plan to make some more dolls as soon as I get more fabric.

I used some scraps of home-dec weight material and some webbing to make a simple bag to put everything in. The one regret I have is that I didn't put any pockets inside - that would have been great for the tiny shoes!

flat dolls bag

I really enjoyed making these! Great, clear pattern and adorable result!

Friday, March 23, 2012

Color books

Our local Borders went out of business a few months ago, and I stopped by during their going-out-of-business sale, and perused the magazine section. I picked up a copy of 101 Patchwork Gifts, and enjoyed looking through it when I didn't have brain cells for several weeks (twin infants=brain dead).
These cute color books popped out at me. I knew they would be a lot of work (16 squares for each color, 8 colors=128 squares per book), but cute!

color book

I pulled out all my scraps that I could get at least a 2.5" square out of, and sorted them by color. Then I grabbed full pieces of fabric that I needed to fill in colors that were low on numbers. I tried to batch cut them as much as possible, since I was planning to make four books (512 squares!).

color book

I think cutting the squares took longer than sewing them together!

color book

I sewed the pages together in sets of two, put batting in the middle, sewed them rights sides together, turned them right side out and topstitched around each edge.

color book

I used small pieces of fabric (mostly remnants - again with the remnant problem!) for the covers.

color book

Four books later and I had gifts for the small kiddos in our lives for Christmas! They are kind of I-spy books too, which I really like.

color books

Wednesday, March 21, 2012

For my table 3

I found some adorable fruit/food fabric about a year and a half ago at JoAnn's. I loved it, but didn't know what to do. At the time hubby and I were working on ways to make our home 'greener.' Cloth napkins!

Fruit napkins

I bought one yard of each of three prints. I wasn't sure how big I wanted them to be, but I wanted at least four napkins from each print, and I wanted them to be thick and double sided. Instead of doing math, I just folded my fabric into 8ths, then cut on each fold line.

Rows of fruit napkins

I sewed the fabric right sides together, leaving an opening, turned them right side out, and topstitched around each edge. That's it! We use them every meal. I love them, and I love not having to buy paper napkins!

Picnic napkins

This Christmas I couldn't resist this cute holly fabric, and decided we needed some holiday napkins. We have 8 of these since we usually have guests around the holidays.

Holiday napkins

Tuesday, March 20, 2012

For my table 2

I bought some of Denyse Schmidt's Picnics and Fairgrounds line before the babies were born. I had no plans for it, but I NEEDED it. Then, I bought some more. Ahem. (In my defense, some of the second purchase were remnants. And I do have a remnant problem). I thought the cute blues and greens would be nice for something in the kitchen.

I wanted to make a table runner, but I couldn't find good instructions for a simple one online. (I didn't want to fuss with applique or complex shapes - I just wanted patchwork!) So I measured the table, took into account how big the placemats were (but the patchwork ones actually were made after this!), and started cutting.

I cut 4.5" squares (again to take advantage of my 1/4 yard cuts) and cut 42 of them (14 in each row, 3 rows). I ended up with a runner 56.5x12.5" I randomly chain pieced into twos, set three aside. Joined the others into fours, set three aside. Joined the fours into eights, joined the twos to the fours (to make sixes) and joined a six to each eight (I hope that makes sense!). Then I ironed my seams and joined my three rows.

I quilted 1/4" away from each side of each seam, backed with another remnant of fabric and machine bound with some green cotton I had in my scrap bin.

Table Runner

Monday, March 19, 2012

For my table

A few months ago (um, I guess really almost a year ago!) I saw these cute food print fabrics at JoAnn's. I loved them, but what do you do with them? Placemats!!
I chose six prints - bananas, green and red apples, oranges, cherries, and strawberries. I bought a quarter yard of each, and took them home to do some math. Since I had quarter yards, I cut my squares at 4.5" (to get two out of the height of each cut). I measured a current placemat and decided on 13x22 (three squares high by five across).  I wanted to make six placemats (since there are six of us now!)

I cut all my squares (90 total - 15 of each color) and then started chain piecing - I set aside 18 squares (since five is an odd number, I didn't want to piece squares that I would have to unpick). I paired my sets of two up and chained pieced those. Then I added an extra square to each set of four. Ironed my seams and sewed the strips together.

I bought 1.5 yards of red Kona for the backing, and used scraps of batting. I quilted 1/4" on each side of each seam. I used a remnant of orange material for the binding, and tried machine binding (sew down to the front and fold back - sew down again). It didn't go so well, but who is going to see the back of my placemats? (If you come over, don't look!)

We really like them - they are very bright and cheerful!

Patchwork Placemats

Friday, March 16, 2012

Easy notecards

My niece is about to have her first birthday. Her parents don't want tons of toys (which I totally understand!), but I had to give her a gift. I wanted it to be useful and simple.

I picked up these initial stamps at Michael's right after Christmas (I have other plans for them), and realized they would work perfectly for this project too.

I have a ton of notecards that I was planning to use as Christmas cards, but they were too small to fit a picture in, so they have been repurposed.


Bam! Instant gift! She can use them as thank you notes or anything else she would like. Simple, practical, what more could you want?

Wednesday, March 14, 2012

Pinterest Challenge

Several months ago, via Apartment Therapy, I found the Young House Love blog. I throughly enjoy reading their blog, and living vicariously through their home improvement projects (since we have no budget for projects!). A few months ago they did a "Pinterest Challenge." Choose a project you have pinned, do it/make it, post about it. I have become better about doing the things I have pinned, so I decided to do one in a timely manner for their winter challenge.

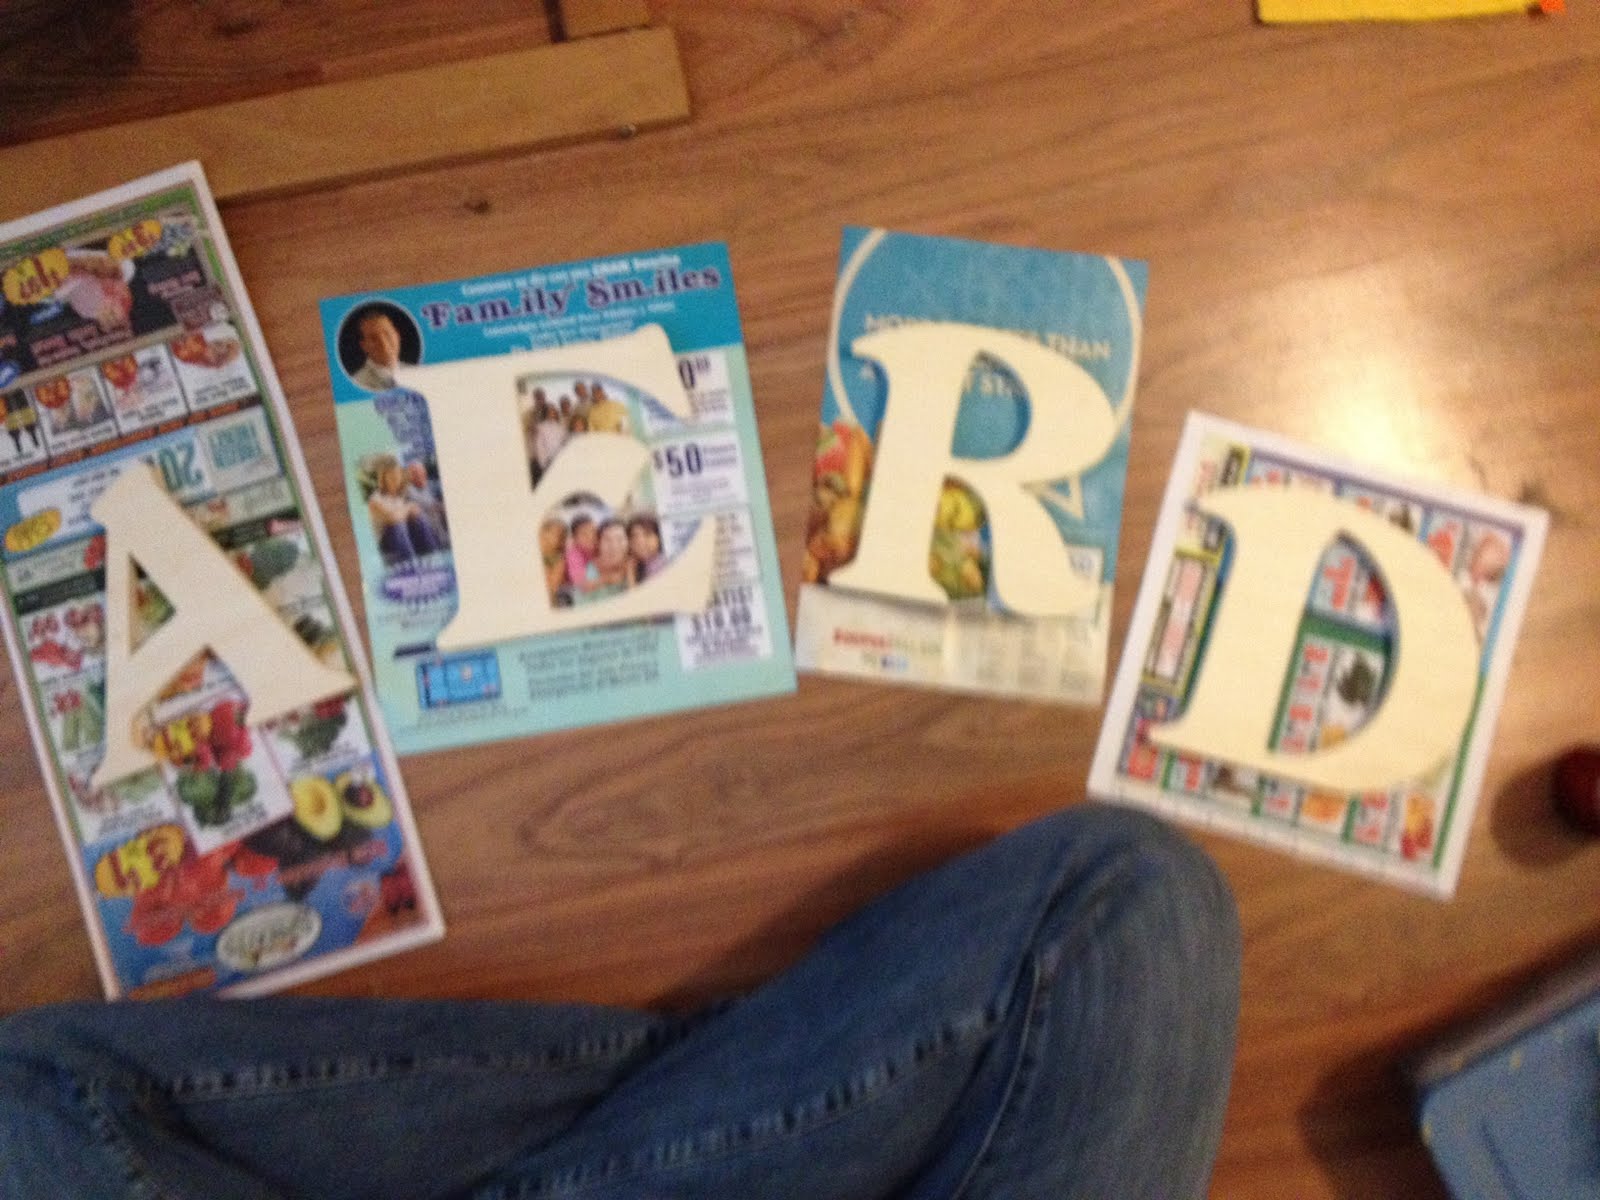
This was my inspiration for this particular project. We have turned a corner of the playroom into a reading corner with some baskets of books and pillows and a little chair. But it needs some decorations. I liked the letters in this picture, so I perused the wooden letter aisle at JoAnn's the last time they were on sale. I ended up with the same letters used in the inspiration room (completely unintentionally!). But I didn't want plain letters. I have a good amount of craft paint in my stash, so I sat down and picked out four colors.

I had the foam brushes in my craft stash as well (I don't know if these are the 'correct' brushes to use, but they worked fine.)

I assigned each letter a color, laid the letters out on newspaper, and got painting.


I did around the sides/insides first so they would be easier to hold. 


I did two coats of paint on each letter and let them dry. 


They aren't hung yet, because hubby hasn't been home when the babies have been awake since I finished (the wall of their room backs up to the playroom, and I didn't want them to wake up to the hammering). I'm planning to try to hang them on nails, so that we don't have to attach hangers or drill holes. We'll see how it goes! I'll have pictures when we get them hung!

Monday, March 12, 2012

Monthly onesies

While I was pregnant with the twins I saw some sellers on etsy selling cute monthly stickers for onesies. I liked the idea but didn't want to use stickers  - I wanted something that would last longer and could hold up in the wash (I really wanted something they could maybe keep for their kiddos). But it also needed to be easy enough for me to make two of every month. Enter freezer paper.

Freezer paper is awesome. I use it to trace patterns (so that I don't cut up originals), and they store easily. Freezer paper also makes great stencils - you can trace any design onto it (I've heard you can put it through a printer, but mine doesn't like it), and cut it out and iron it onto fabric - the shiny side will stick to the fabric. Then add some fabric paint and voila!

Since hubby teaches math we decided not to use numerals for each month.

monthly onesies 1

monthly onesies 2

For their three month shirts we used iron on transfers, since it would have been a lot to do with a stencil. They don't look as nice quality-wise, but they are cute nonetheless.

3 month shirts

This has been a really fun project, and I am looking forward to more freezer paper projects!

Friday, March 09, 2012

Button Bracelet

Several months ago I saw this cute idea on pinterest. It was one of those "ooh! cute!" moments, and I'm sure I was up in the middle of the night with a baby, so I pinned it (because otherwise we all know I would forget it). Fast forward to recently, when I was perusing my boards (deleting pins, checking for original links, etc) and saw this again. I recently inherited a large button collection from my husband's grandfather's wife, and was given a gallon ziploc full by my MIL's boyfriend. (I have a lot of old buttons now. It's awesome!)

I picked out some that sort-of matched and were in colors I thought my sister-in-law would like (this is the other half of her recent birthday gift). I dug out some 1/4" elastic, measured around my wrist and got to work.

I alternated big and little, stacked some and kept the colors from 'touching.' I used white thread since all of my buttons were different colors. I tried laying out my design first, but didn't really prefer that method, as it was hard to tell how much to overlap the buttons when the elastic was flat. I did end up using a few more buttons than I had originally pulled (something to keep in mind if you want to make one). 

modeled by the three-year-old

I think it turned out pretty cute! Certainly not something everyone will have! Now if only I had a reason to wear jewelry, I would be cranking these out for myself!


Wednesday, March 07, 2012

Pattern weight DIY

For years I pinned patterns to fabric. That's how mom taught me, and I didn't think there was any other way. Then, as I've been reading more sewing blogs lately, I saw more and more people talking about pattern weights. A little research and I found out that folks used these to hold down the paper pattern and traced around it, then cut it out. SO MUCH EASIER! However, pattern weights are pretty pricey, so I did a little more research and found out that people made their own. I read a few tutorials and wasn't excited about any of them enough to copy them, so I made my own.

I used 5/8" washers. I bought two boxes of 25 - enough for me to make four sets of four weights each (three washers in each weight).


I hot glued the weights together (glue two, let them dry then add the third). 

I allowed several hours for the glue to dry, and then I peeled off any strings. I wanted the weights to be colorful, but didn't want to seam/trim/sew pieces of fabric to wrap them with. So I pulled some scraps and started trying things out. I used pieces that were about 1.5" wide. They all came from my scrap bin (off the backings of my two most recent quilts!). I don't remember how long they were - I cut them about 16" long, and trimmed off any extra (skinnier pieces took longer pieces).

Then I started wrapping. If you wanted you could hot glue down the end before you continued wrapping, but I didn't. I figured it would be covered by the other pieces eventually. 


I continue wrapping until I couldn't see any more of the washer. Then I trimmed the fabric down, put some hot glue down on the washer and glued down the fabric edge.


I repeated the process three more times with three other colors and voila! Instant birthday gift for my sewing sister-in-law!

Pattern Weights

Saturday, March 03, 2012

Quilt labels

One 'crafty' thing I've been up to lately is making labels for quilts. These two are my most recent finishes. It will take me a while to go through all the quilts that need them!

Thursday, March 01, 2012

March is national craft month

So I'm going to try to post a lot this month. Some will be projects I do with my kiddo and others will be things I am working on.
Tonight we made a book. I had picked up these chipboard books at Michaels on clearance (I think I paid $.50) and put them away, not really sure what we would do with them. We had been talking about bees today (we saw some today even though it's really early), so I thought we'd make a book about bees.
I pulled out our Childcraft encyclopedia volume about bugs. We read the section about bees and I chose some easy facts about bees to include (things a three year old could understand). I wrote them on the back of the pages and Samantha drew pictures of bees on the fronts.
It took us about 20 minutes and I'm sure we will read it over and over again.