I am really so pleased with the way this quilt finished up! I was inspired by this quilt, and when I received a bundle of Sketch for Christmas last year, I decided that it would be perfect for this project.
I love wonky stars, and really enjoyed using them again in this quilt. I'm also a sucker for a rainbow, so this was two of my favorite things!
I used a beautiful dark grey Painter's Canvas for the backing and a Kaffe Fasset dot for the binding. I quilted diagonal straight lines in one direction, to give the illusion that the stars were 'shooting.' I am very pleased with how these things really make the quilt complete. I can't wait to snuggle under this one!
Thursday, February 20, 2014


Wednesday, February 19, 2014
WIP Wednesday

I am so excited that I managed to finish up the last five Lucky Stars blocks last week. Now I have to decide how I want to put my quilt together! I haven't been sewing much this week, but I am looking forward to getting back to the machine. I have five quilts waiting to be basted, and I finally bought batting. Hoping to get backing made this week and get some basting done next week! Three are queen sized, one is nearly, and one is a throw, so it will be a lot of basting!
Today I sat down and made a list of what I want to work on in the upcoming months, and I think I will pull fabric and play with color ideas just for fun between chores tomorrow!
Linking up with Lee!
Tuesday, February 18, 2014
Tangled Yoke: A New Knit Sweater for me!
I am so very very excited to have this sweater finished and to have it fit so well!
The pattern is Tangled Yoke from an old issue of Interweave. I am a bit ashamed of how long this one was a WIP, but I would stall out on certain sections (before the sleeves, after the yoke was joined, before the cable, in the middle of the cable). However, it only took a few hours of work to get her finished up! I am really pleased with the fit - it's a worry when you started the sweater before you had four kids!
I am a bit disappointed by the ladders in the sleeves - I'm chalking it up to not wanting to pull the yarn too tightly on my DPNs, since it has a tendency to break. I'm calling it a design feature now!
I can already tell that this is going to be my go-to sweater. It is just the right amount of warmth for most Texas winter days, the sleeve length is great, and it is comfy buttoned up.
Now I'm off to finish up two more sweaters!
Monday, February 17, 2014
New Quilt-a-Long?
So last spring, I came across this pin on Pinterest.
(This image is from the Quilter's Guild of Plano)
I loved what they had done - taken the same block and sewed it up in 12 different ways, using the values and hues of the quilt blocks to make the block look different each time. I immediately drew up the block, and colored it in 12 different ways, then bought fabric and started cutting. It got put to the side over the holidays, but I decided it would be one of the first quilts I finished this year, so I plowed through all of the blocks in just a few days.
I would love to gauge interest in holding a quilt-a-long for this design. It can be as easy or as complicated as you would like. You can color your blocks in your 12 designs, or you could follow along with me.
You would need (at minimum) 1/2 yard cuts of fabric, three in values of one color, three in another and 2 in your last. I suggest a dark, medium and light value in each shade. I used three values of raspberry, three of teal and two greys. (My dark grey I used for sashing and borders.)
Please let me know if you are interested! I would love to see all the possibilities you could dream up!
Friday, February 14, 2014
FWMQG Solids Challenge
I am really excited about this quilt! I purchased Becoming a Confident Quilter with a Christmas Gift Card, and I loved this quilt in the book (Less is More). I thought it would be perfect for the FWMQG Solids Challenge!
I used a FQ bundle of Kona solids, and changed up the pattern a bit to use what I had. I paired dark and light shades of most colors (I paired yellow and light orange and red and dark orange) and used Kona Ash for the centers of each block. The background is Kona Steel, and I like the blue-ness of the grey with these colors. This was a quick quilt to put together and I really like it. Now to make a backing and decide how to quilt it!
I used a FQ bundle of Kona solids, and changed up the pattern a bit to use what I had. I paired dark and light shades of most colors (I paired yellow and light orange and red and dark orange) and used Kona Ash for the centers of each block. The background is Kona Steel, and I like the blue-ness of the grey with these colors. This was a quick quilt to put together and I really like it. Now to make a backing and decide how to quilt it!
Thursday, February 13, 2014
Valentines Gifts 2014

I wasn't sure what to do for the teachers for Valentine's Day, but I wanted to do something small. A friend gifted me this cute heart fabric, and I whipped up four coffee cozys today. I even had heart buttons for them!

I have come to think that the best thing about Pinterest is the ideas for class/teacher gifts (and the quilty inspiration too, of course!).
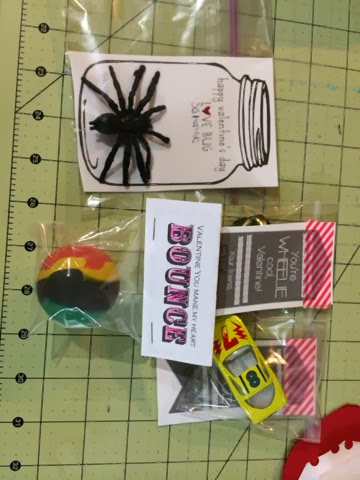
I had pinned the Love Bug idea a few years ago, and we finally did it this year. Ben did bouncy balls (Valentine, you make my heart bounce!) and Ellie wanted to do 'vroom-vroom' cars. Her cards say things like "I wheelie love you," and "valentine you make my heart race!" I bought cute things at the dollar store and baggies at JoAnn's, printed the tags on cardstock and voila! Done! I think they are all really cute, and they were quick and inexpensive, and NOT CANDY! :)
Wednesday, February 12, 2014
WIP Wednesday - Paper piecing

I have mostly been knitting as fast as I can this week, but I did finish up these four Lucky Stars blocks at the end of last week. I always think I love paper piecing, then it can be tricky to line up seams, and I get frustrated and vow never to do it again, and then I see the finished blocks and love it again. It's a vicious cycle I guess!
Tuesday, February 11, 2014
O is for Octopus
My apologies in advance, I didn't get a shot of the girls wearing these on O day, so this is what you get.
I had picked up some of this cute fabric a few months ago, and when I went back to get some, they were out of it. I had a hard time choosing something else I liked, and then I thought I could order online! Duh! Luckily, when I went to do that I saw that JoAnn's now has a 'check store stock' feature, and it said my local store had some more of this print, so I stopped by and grabbed some. Samantha really wanted her and Ellie to have matching skirts again, so I made two. They really like them, which is always nice!
I had picked up some of this cute fabric a few months ago, and when I went back to get some, they were out of it. I had a hard time choosing something else I liked, and then I thought I could order online! Duh! Luckily, when I went to do that I saw that JoAnn's now has a 'check store stock' feature, and it said my local store had some more of this print, so I stopped by and grabbed some. Samantha really wanted her and Ellie to have matching skirts again, so I made two. They really like them, which is always nice!
Monday, February 10, 2014
Heart Decor
I am hoping to get our heart decorations put up this week!
For this I traced a heart cookie cutter onto scraps of felt and sewed them all together. It is just enough cuteness!
And I still need to find a place to hang this from last year! The tutorial for this one is here.
Friday, February 07, 2014
Ravellenic Games 2014
So this year, for the Ravellenic Games, I am working on finishing projects!
I need one sleeve for my Must Have Cardigan, and button bands.
My Featherweight is much further than this picture, and only needs sleeves.
My Tangled Yoke needs about three inches of yoke and button bands.
I also want to finish Henry and Ellie's sweaters (Ellie's needs sleeves, Henry's needs fronts) and maybe finish a few single socks to have more pairs!
I can't wait to get started tonight!
Thursday, February 06, 2014
Patchwork Super Tote
I purchased the Super Tote pattern back in the fall, with the intention of making it for myself. With holiday gift making, it got pushed aside, and then, I couldn't decide what fabric to use for the outside. I thought I had settled on doing a quilt-as-you-go exterior, but when I had both panels finished, I decided I didn't love it. I do think I will save them and use them to make a bag for Samantha for school in the fall.
As I thought more about it, I wanted to do something more patchwork-y. I kept thinking about this project bag I had made for a friend, and I decided that I wanted to do something like that. I pulled all of my DS scraps and fat quarters, and got cutting.
I pieced my 2.5" squares into seven rows of seven squares, and fused them to fusible fleece. Then I basted the pattern piece I had cut out of canvas to the patchwork, and trimmed my sides and corners. I did the same for the back piece. For the top small pieces, I did two rows of seven squares.
The gusset and straps are Yarn Dyed Black Essex linen. I basted batting to the outer gusset, and canvas to the inner to give them some extra strength.
I eliminated the interior pockets, because I knew I just wouldn't use them. The interior print is from Half Moon Modern, and I have been hoarding it for a while! I did use a lightweight interfacing on the interior pieces to keep them from being too floppy.
I used more DS for the zipper pieces, and essex linen for the zipper tabs. I fully lined the exterior pocket and used a magnetic snap as well. I didn't even break a needle top stitching it!
I really love the way it came out, and I can't wait to make another one!
Wednesday, February 05, 2014
WIP Wednesday
This week I've been busy binding that pile of quilts I got basted a few weeks ago. And I wanted to ask - do you buy your backing and binding when you purchase the rest of your fabric? Or do you buy things you think will make a good binding/backing for something, someday and just choose from your stash when you need something? Sometimes I purchase backing when I plan a quilt, but I often forget about binding, and I don't have a very large stash, so inevitably, I am going back to the store for either or both when I'm ready to baste/bind.
I've also been working on my Swoon blocks and I really like the way they are coming out.

And in spare moments I've been working again on my Dancing Triangles quilt - almost have all the pink, green, orange and purple piecing done - then on to red, blue and yellow!

Tuesday, February 04, 2014
Knitting
I have been knitting, but mostly class samples!
A February Baby Sweater
Ishbel (class starts Saturday!)
Olive Basket Sweater
Clapotis
Lucy Hat for my sister
I, of course, have many more projects on my needles!
A February Baby Sweater
Ishbel (class starts Saturday!)
Olive Basket Sweater
Clapotis
Lucy Hat for my sister
I, of course, have many more projects on my needles!
Saturday, February 01, 2014
KCW Challenge - Winter 2014
So, at the end of KCW last week, I decided I would use the opportunity to crank out a few more outfits for Sew All 26. More details to come (as Samantha wears these outfits), but I just wanted to share. I was able to make these all Friday - and it felt good to get back to garment sewing a bit!


Thursday, January 30, 2014
N is for Numbers
I found this fabric on clearance at fabric.com a while back, and thought it would be perfect for N!
Samantha specifically requested ruffles on her dress, and pockets on the sides. I made the Geranium dress (again!), with some mods. I did the option for the ruffled sleeve, but I made it with the cap sleeve choice. I ruffled the skirt instead of making pleats (pleats are my preference!) but added in the inseam pockets that the pleated skirt offers (I traced the pocket separately on a sheet of paper, and laid it to the side of the skirt pattern when I was cutting it out) and cut extra fabric to make a ruffle at the bottom. I also added length, as she is going through a growth spurt.
It was nice to make changes to a pattern, and understand enough about what I am doing for them to come out correctly!
Monday, January 27, 2014
Modern HST Quilt-a-Long Finish!
This is it - the last post in our Quilt-a-Long! I can't believe we are finally done! It was very strange not to write a block post yesterday! Today I wanted to share with you how I chose to assemble my quilt top.
I decided to use red for my sashing and borders - I wanted each block to stand out, and I love black/white and red. I used just under 3 yards - and I prewashed my red, just in case. Each sashing piece is 2.5"x8.5". I used black for the cornerstones - each one is 2.5"x2.5". I am not usually a border person, but again, I felt like this quilt needed one small border to frame the blocks. The border is 2.5"xwidth and length of the quilt.
I really really love the way my quilt came out. I learned a lot - two of these blocks have small mistakes in them, but for the life of me I couldn't remember (or find!) the errors - so I am living with them! And I learned that consistency is very important - these blocks were sewn on 4 different sewing machines - each with a just slight difference in a scant 1/4" seam - which means some of the points are cut off on some blocks, but again - I am living with it!
I have no idea how I will quilt this one, and since I have run out of my giant roll of batting, I don't have to worry about that until I get more! I will be sure to post a picture when it is finally complete.
So far there is one completed quilt top in the flickr group - I love the variety of colors in the blocks and how it looks so different with no sashing - gorgeous! Be sure to share yours if you finish!
Thanks for sewing along with us! And if you joined in late, don't worry, I will leave the posts up indefinitely!
Friday, January 24, 2014
MQG Riley Blake Challenge
I am really excited about my finished item for the MQG Riley Blake Challenge!
I used the x + block to make four scrappy blocks, and sewed them together for my pillow front. I quilted it with straight lines 1/4" apart. For the back, I used more of the grey, and did a hidden zipper (because all I had that would fit was UGLY!) which was quite fun.
I really like the bright colorful prints from this challenge, and I like the scrappy look the different prints and colors provided. This is a breath of fresh air in my living room
Thursday, January 23, 2014
M is for Monkey
We had too many ideas for M, but it came down to the outfit being due right after school started, so mom ordered some fabric and whipped up a skirt.
I feel badly making so many skirts (it feels like cheating), but she loves them and really does wear skirts more than anything else.
I used a cute Ann Kelle print - she was very excited that it was pink! :)
I feel badly making so many skirts (it feels like cheating), but she loves them and really does wear skirts more than anything else.
I used a cute Ann Kelle print - she was very excited that it was pink! :)
Wednesday, January 22, 2014
WIP Wednesday
I've done a bit of cutting and piecing this week, in between coughing fits, and dealing with sick kids. Blech.



I'm ready to assemble the blocks on my gift quilt.

I cut all the pieces for my solids quilt for the FWMQG Solids Challenge.

And Saturday, during baby's awesome nap, I basted four quilts! Now to have the energy to quilt them!
Tuesday, January 21, 2014
Tokyo Subway Map Quilt
I am so so so excited to have this one finished!
I worked on this full steam this fall, and then it sat waiting to be finished until I was done with gifts. I finished binding it on New Year's Eve - one last 2013 finish!
I used Remix rainbow stripe for the back, and Remix chevron for the binding - I wanted to continue the rainbow 'theme' of the front. I quilted 1/4" away from the 'lines' on the outsides of the 'lines.' I think I might like it to have more quilting, but I'm not sure what else I would do besides more straight lines.
My favorite part is probably looking at all of the small scraps left over from previous projects - such fun finding them!
This is my new favorite quilt to snuggle under this winter! I highly recommend this pattern if you like to piece tiny squares! (my favorite!)
Subscribe to:
Posts (Atom)