Friday, July 06, 2012

Simple Handmade Holiday Gifts

(Apologies for not having this post up yesterday - was felled by a stomach bug - ugh!)

If you're looking for some simple handmade holiday gifts, and you can sew, look no further than panels. Panels are a great way to make something simple, and to give something you've made. I usually purchase panels at both my LQS and JoAnn's. These projects all happened to come from JoAnn's.

Night Before Christmas

Fabric books are a great gift for any age child! They come together easily, the instructions are printed on the panel, and they are inexpensive. I have made several - these are just the holiday specific ones I've made.

Mary Engelbreit book

If you're interested in quilting, but intimidated by the actual quilting process, panels are a great way to get started. I purchased these, added some batting and backing, and quilted simple diagonal lines in both directions. I added some binding, and voila! My mom uses them as wall hangings during the holidays.

Holly quilt

Believe Stocking

More next week!

Tuesday, July 03, 2012

Christmas in July

For the past several years I've been slowly adding handmade items to our Christmas decorations. I had several things I wanted to share here, but didn't finish them in time to make them blog worthy! So I thought I'd do a little Christmas in July here, for all of us crazy folks who like to plan way too far ahead! :) Every Tuesday and Thursday this month, I'll share something holiday related I've made. Some will have tutorials, and others will just be finished objects, with relevant links. I hope you'll find something that you want to make for yourself or for gifts!

stockings

Today I'm sharing the stockings I made for Ben & Ellie last year. I have knit stockings for everyone else, but knew that there was no way I could get two stockings knit in time. So I found some cute holiday fabric, and whipped up some quilted stockings. These were seriously so easy that I made both of them in a naptime. Great, easy, impressive project! I like them so much that I sort of don't want to knit them stockings, so that I don't have to put these away! I'll have to find another use for them someday.

The free pattern and tutorial is from Prudent Baby, which seriously has some awesome patterns and tutorials. I was using leftover binding, and I had just enough to do the tops of the stockings, so I used ribbon for my hanger - it worked great. The adorable fabric is from Riley Blake last year. The interior fabric coordinates, but I don't have a picture of that. I highly, highly recommend this pattern if you want something cute, quick and functional!

Friday, June 29, 2012

JoAnn's Simply for Baby Nursery Contest

I have entered JoAnn's Simply for Baby Handmade Nursery Contest. You can see my video of Ben & Ellie's nursery here. I haven't shared all of the handmade things on the blog yet, but I'll get to that - maybe this week?
Enjoy!

Thursday, June 28, 2012

A Return to Knitting

So this blog used to be about knitting, right? :) And I do still knit, though the sewing has taken over in a big way, especially since I hurt my hand last fall and could barely knit at all. Thankfully, with rest it has gotten much better. I still have to take it easy when I knit with tiny needles (which is bad for all those socks I wanted to knit hubby!), but I can knit for good stretches at a time, when the kids let me!

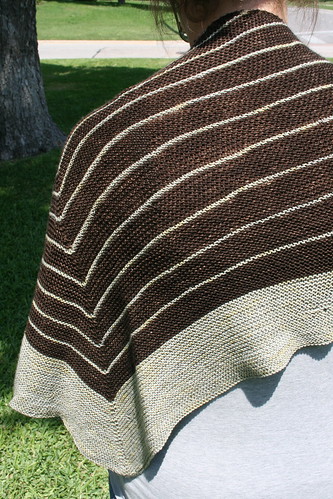
Stripe Study Close Up

I started this project this winter, when I was going through a particularly stressful time, and needed something easy and pretty mindless to knit. I pulled some yarn from the stash and got started. Unlike much of my knitting, this project has no intended recipient.

Stripe Study

I wished it had blocked out a bit bigger, but it is what it is. I liked the squishiness of the garter stitch and that lovely brown (Malabrigo sock yarn). Ravelry details here. More knitting to come!

Monday, June 25, 2012

A Quilt for Us

Over the last nearly 4 years I've been 'quilting' (making quilts? Am I really a 'quilter'? When do you give yourself that title?), I haven't made a quilt for our bed. Lots of other folks have quilts and we have lots of throw quilts, but not one for our bed. That is now changed!

I had been waiting for our 'new' room to be done - we moved into a new room when we added on to our house last spring. The twins are in our old room and we have a new master bedroom in our new 'wing' of the house. It still needs a lot of sprucing, (right now it feels like an apartment room - no personality!) but a new quilt is a good start! When we moved rooms we decided that no pets would sleep with us (previously they all did!), so we don't have to worry too much about having a nice quilt that dogs and cats could demolish (one of our dogs like to chew on things and has ruined all of our previous bedspreads/quilts and many of our sheets).

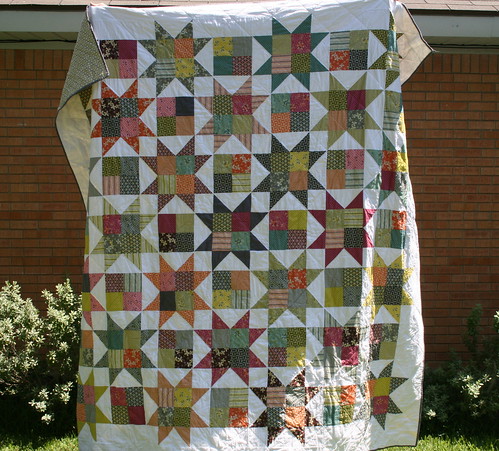
A quilt for us

Choosing fabric and a design was the hardest part (of course!). Two years ago I had asked hubby to get me a fat quarter set of Hope Valley, and had been hoarding it for just the right project. We decided to use that (with some Kona White and Kona Coal). Hubby had to have a large say in the design. I wanted to do the Swoon pattern, but he vetoed it (something about the sizes/symmetry of the corner rectangles and triangles if I recall correctly. It's the math teacher in him). We settled on the Plan C quilt from Schnibbles Times Two. I enlarged it by adding blocks to make it five stars by five stars instead of three by three. That made 25 stars, and since I had 24 Hope Valley prints, I used Kona Coal for the center star.

Hubby even helped me lay out the blocks so that we could make sure each star didn't contain the same print inside that was in the star points. This was my first time making a flying geese block, so I practiced on scrap fabric before starting. I did loose some star points, but I don't think it looks too bad for my first try.

A Quilt for Us

I added four inch borders on each side, bringing the finished quilt size to about 98". It barely fit in our playroom floor, so I can't baste a quilt any bigger than this in my house! I did minimal quilting - just 1/4" outside the star lines on the diagonal and through the center of the four blocks that alternated with the stars. We had a disagreement on the fabric for binding (I wanted to use some DS Quilts fabric that was grey with white dots) and he won - more Kona Coal. I do like it though. I used a grey and yellow and white print from JoAnn's for the backing with a touch of white and yellow.

As soon as we finish up a few more projects in our room, I'll take some pictures of it in there for you too!

Oh, and I'm linking up with Sew Modern Monday today! Go look at some other great finished projects!

Friday, June 22, 2012

First Birthday Quilts

Way back when I was pregnant with Samantha I wanted to make a quilt. I'd been sewing since I was a little girl, and had recently taken it back up again (although all I was sewing were tote bags for my knitting projects and simple skirts for myself). But a quilt - that's just cutting and sewing straight lines, right? I bought a bundle of fabrics at JoAnn's, and cut it up into squares. And the squares sat and sat and sat.
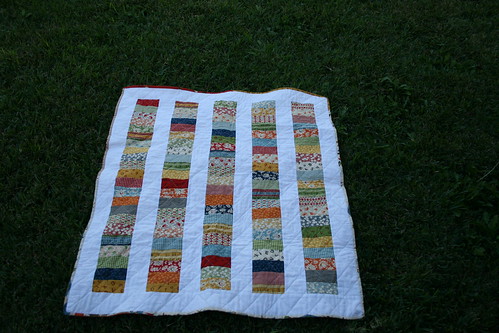
The spring of 2009 my mom and I went to visit a real live quilt shop, right here in my town! I knew NOTHING about how much fabric it would take to make a quilt, or really anything, but I picked out some fabric already cut into little squares and some yardage that I liked that I figured I could use as a back. I had gotten the book Last Minute Patchwork and Quilted Gifts for Christmas that year, and there was a cute coin quilt in there I thought I could make. I ended up using a tutorial over at the Moda Bake Shop though, since I had charm squares, and wasn't brave enough to figure something else out.

I cut my charm squares in half, and sewed them together in rows, added some white sashing, and learned to baste! (Thanks internet!) I used painter's tape to mark diagonal lines and quilted it. Added some binding, and voila! A first finished quilt! (The fabric is Wee Play, and if I had known then how much I would love it, I would have bought a lot more! I do have a jelly roll stashed away for someday!)

Stacked Coins Quilt

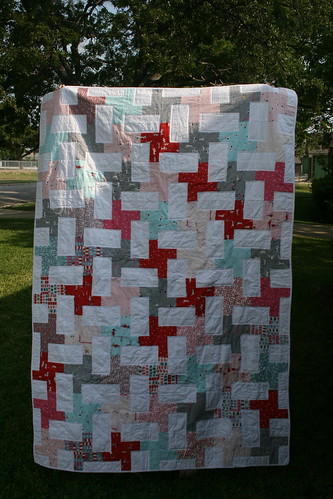
Since I had made a quilt for her first birthday I figured I had to make quilts for Ben & Ellie's birthday as well. When Aneela Hoey's Sherbet Pips line came out I loved it. I had a gift certificate I had received for Christmas, and I had seen previews of her Little Apples line too. I figured these two lines complimented each other and would be cute for twin quilts! I purchased a jelly roll of each, with no plans for what I would make. This spring I got down to business, and spent a lot of time looking through my quilt books, my flickr favorites and my pinterest quilt board. I decided on two patterns (they also happened to be from the Moda Bake Shop!), and started cutting.

Cartwheels quilt

Ellie's quilt used the Cartwheels pattern and Kona White. I wish now I had added borders to the quilt, but it it still cute.

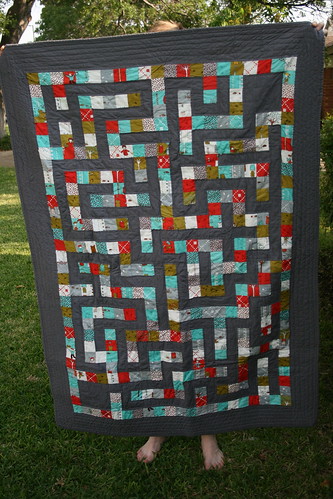
Maze quilt

Ben's quilt used the Charming Maze pattern and Kona Coal. I love it - so cute and the maze actually 'works!'

Three kids, three first birthday quilts! And the twins were even done in time for their birthday! (Samantha's was about 3 days late!)

Wednesday, June 20, 2012

WIP Wednesday

I've only got one picture of my WIPs this week (I actually only have this quilt and a few blocks - my only WIPs!!! Clearly I need to start more projects!).

Granny Squares in progress

This quilt top is almost done - just needs borders!

Now I have to decide what quilt to tackle next....

Monday, June 18, 2012

Watermelon Dresses

Last summer I saw the cutest pin on pinterest that was a picture of a watermelon dress someone was selling on Etsy. I thought - huh, I could make that! But I just didn't get to it last summer (wonder why?), so I began looking for cute fabrics to make them for the girls this spring.

Watermelon dresses

The original inspiration dress had a solid pink with a green polka dot for the trim. I didn't find anything like that, so I used solid green, and a tiny white dot on bright pink for the body of the dress. I used just under 1.5 yards of pink (I think) and 3/4 yard of green. I tried to cut the proportions similar to the body for the girls - so Ellie's trim is smaller and her ties are narrower than Samantha's. I did a basic pillowcase dress pattern.

I was lucky enough to find some bright pink bias tape that almost perfectly matched in my stash of vintage trims! I used scraps of black for the seeds - I just freehanded some ovals and cut them out of steam a seam and then ironed that on and cut the fabric out. Instead of zig zag stitching around each seed (each dress has 10 seeds), I sewed just inside the edge - I think it is fine if they fray a little.

Watermelon dress

After their candy corn dresses last fall, I decided to have these dresses tie on just one shoulder - so much easier to keep on! If I do the two ties again, I use bias tape from the edges, so that the ribbons/ties don't fall out as often.

Samantha loves her dress and wants to wear it whenever it is clean. She loves matching her baby sister. Reactions like that make mommy love sewing for her girls!

Thursday, May 24, 2012

Make your own Birthday Banner (tutorial)


I made my first banner for Samantha's birthday almost four years ago now (wow!). I was inspired by the one in Alicia Paulson's book Stitched in Time. I used freezer paper to stencil the letters to personalize it and have enjoyed using it every year. But hers is pink and girly, and I would have to find a new fabric to add B&E's names, so I just decided to make them their own.


Supplies: 
One charm pack of fabrics you like or enough 5" squares to spell out your desired message. 
Freezer paper (I get mine at the grocery store)
Scissors or a fine, small tipped 'box cutter' razor (has a handle)
Pencil for tracing
Printer and computer
Two packages of bias tape (or only one if you're not adding a name), or homemade bias tape
Pinking shears
Ruler or straight edge
Sewing Machine and matching thread
Fabric paint and paintbrush
Iron


First you need to decide what letters you will need. If you're making a birthday banner, you'll need h, a, p, y, b, i, r, t, d and the letters for the name you'd like. 
Chose a font you like that is big and bold, and print your letters at your desired size (hold them over your fabric to make sure they are not too big if you're worried!). 


Then begins the tracing process. You want to trace each letter onto freezer paper. Trace onto the 'paper' side - not the slick side - the slick side is the side that fuses to the fabric when you iron it down. I find a nice mechanical pencil makes a good tool for this. Allow enough room around each letter for adhering to the fabric, and make sure you trace as many copies of each letter that you'll need (you can only use each stencil once - so you'll need to trace p twice, y twice, h twice, a twice, etc). 


Then starts the fun of cutting! I use a small box cutter-type handheld razor sometimes, but for large areas I use small tipped scissors, as I don't have to worry about having something underneath to protect my surface like I do with the razor. Go slowly! 


For letters that have an 'inside,' make sure you save those pieces (b, d, p, o, a, e, g, q)


Then lay out your fabric in a color pattern you find pleasing. Make sure to allow spaces between the words (a blank square), and at the beginning and end if desired. 

Iron each letter to the horizontal center of a square (I just eyeball mine), and put them a bit below center vertically (to allow room for the bias tape at the top).


Iron them on! Make sure you keep them in your color pattern, if it is important to you. When ironing on those letters that have an 'inside', make sure you iron down the inside part of the letter (see d above and b and e below). 


Pour your paint into a container and get your brush. Using light, even strokes, cover the letter.


(I laid out my letters on construction paper. This made it easy to move them around in groups and to keep them in order. It also kept paint off my ironing board!)

Add layers of paint until they have the coverage you desire (I don't wait for them to dry, but you can.)

 I used a dark neutral color for my paint color as I was using a wide variety of colors of fabric, and I wanted something that would 'go' with all of them.

Allow them to dry - I waited about 24 hours. Then carefully peel away the freezer paper. (Don't forget the insides of those letters that have them!)  Keep them in order!

If you want to trim your letters into a shape, now is the time. For my first banner I cut them into a curved edge, but I wanted a pointy banner this time.

I folded the squares in half and measured up from the bottom point.

I traced a line so I would know where to cut. 


Then I used my pinking shears to cut on the line (I used pinking shears because the charm squares were already pinked and because pinked edges are less likely to fray). 


Open 'em up and voila!

Lay out your words and find the center point. Fold your bias tape in half and find the center. Match them up and slide your letters into the open side of the bias tape. Slowly sew them together from the center point out, inserting the next letter as you come to it. When you are out of letters, sew closed the rest of the bias tape. Turn your tape around and sew the rest of the letters out from the center, and sew the rest of the bias tape closed. 
If you have a name, repeat this step.  
(I apologize for not having pictures of this part - I totally forgot!)

Now hang, admire and enjoy! Let me know if you have questions! 


Wednesday, May 23, 2012

A Very Hungry Caterpillar Party part 4

Every year I make outfits for the kiddo's parties. This year was no different - except I had to make double outfits!

I had seen some Very Hungry Caterpillar fabric at Fat Quarter Shop (one of my favorite places to order fabric from as they have a wide variety and are in TX so I get it quick!). I chose a few favorite prints and then had to decide how to use them! I wanted to make something for Ben out of this print, as it wasn't too 'girly' or busy. (This is the fabric I used for the onesies I made for the smallest guests). I thought it would be too much all over a large piece of clothing, so I opted to fussy cut it and just use it for embellishment. For his outfit I wanted something he could wear around for the rest of the summer. After seeing another finished outfit, I chose McCall's 4756 (which conveniently went on sale at JoAnn's about 3 weeks before the party - which was nice because I had been waiting for it to go on sale for about 3 months!). I used a plain grass green quilting cotton.


The only thing I would change would be to use a softer interfacing on the 'bib' part - but I used what I had on hand. This was my first time to use the buttonhole feature on my machine! Unfortunately, it seems to make much smaller buttonholes than it 'should.' I put a huge button in the buttonholer foot, and I had to wiggle a pencil around in the hole to stretch it out for my much smaller button. I used cute multicolored butterfly buttons (Favorite Findings) from JoAnn's.

For Ellie's dress I used McCall's 2213, which is the same pattern I used for Samantha's first birthday dress! I used a different 'view' than Samantha's dress - this one is view A, hers was D (minus the ties).
I used this fabric for the front and purple Kona cotton for the reverse (I think it's eggplant). I used more butterfly buttons for hers as well.  I also made her bloomers from that same large caterpillar print, but I don't have a picture of them. I used the bloomers pattern from Amy Butler's Little Stitches for Little Ones. I chose this pattern over the McCalls bloomers, because I made the McCalls's bloomers for Samantha and they are probably still too big for her now! I like Amy Butler's pattern (I've used it before), but it runs a bit big too - at least in the elastic estimates! I measured Ellie and cut the elastic to fit her. I did leave some extra so I can let them out as she grows.

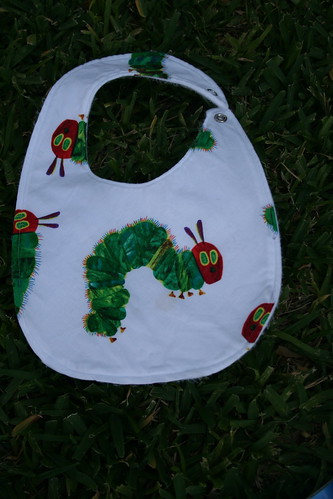
I used the extra large caterpillar fabric to make two bibs for them to wear during cake eating!

Caterpillar birthday bibs

They have fleece on the back because I was out of terrycloth, but I probably won't use fleece again because they are pilling pretty badly already.

When I was putting the fabric links in I noticed that there is a "Happy Birthday" Very Hungry Caterpillar line of fabric coming soon!

Oh, and their shoes are Robeez, and were a gift from my sister when they were born. They were perfect! You can still get them here.

Whew! I think that wraps it up! I'll be back with a post on making a birthday banner next!

Tuesday, May 22, 2012

A Very Hungry Caterpillar Party part 3

I have one more decoration I forgot to share with you in part one!  I had seen this idea on pinterest, but here is the original link. I made our caterpillars a bit smaller, since we don't have a ton of wall space, and needed to display two!  Hubby used his die-cutter at work to cut out circles for me, and then I found a smaller circle to trace over each picture to cut out (I had all my pictures printed at Shutterfly when they had a free 100 print special - I only had to pay shipping, which was almost as much as it would have cost to have them printed at CVS for $.10/each, but at least I didn't have to leave the house! :). We used their monthly pictures, and I wrote how old they were under each picture.


We were so low on available wall space, I ended up using the entry-hall closet door! They were adorable, and may still be hanging up. ;)

I had seen lots of blog posts about serving the food from the book for the party, and I just couldn't resist the idea!  I wanted to make some kind of 'sign' for the food, so that people would 'get' that it was the food the caterpillar ate. There are several food signs available on etsy that you can purchase and print, but no one had all of the food signs for (what I thought) was a decent price. And since we're a one-income family, I wanted to save as much $$ as I could! So we copied the pages from the book that show the food on a color copier (this is allowed for personal use!), and I cut them out and mounted them on green construction paper, and wrote what they were above the picture.

We taped them to craft sticks, and then were able to tape and/or stick the sticks into the serving dishes.


Instead of sausage we served hot dogs, which is our standard party food! 

We had tea, milk, water and lemonade to drink and I couldn't resist butterfly cups, napkins and plates (also from Dollar Tree).

To 'pretty' up the food area I cut a yard of fabric that featured the food from the book in half, and taped it to our buffet. (I am hoping to give it a second life by sewing us some much needed snack and sandwich bags with it!)

Hubby worked his cake magic (his usual duty for any party!), and we had vanilla and chocolate cupcakes with green frosting for the caterpillar's body and a red frosted chocolate cake for his head.
We didn't have a tray big enough, so we just set him out on the table!

Hm, what's this?


Thank goodness buttercream frosting comes right off!

Monday, May 21, 2012

Giveaway Day part 2!

Welcome to Giveaway Day! Hosted by Sew Mama Sew! each year, this event celebrates those of us who create! Anyone with a blog is welcome to join in, and give away an item for crafting (specifically related to sewing), or a handmade item. Today I'm giving away two items!


This item is a set of five reusable cloth napkins and a travel sized placemat! My daughter has lunch at school, and at the beginning of the year they asked us to send two paper towels each day in her lunch - one for a placemat and one for a napkin. I couldn't bear the thought of wasting all those paper towels, so I made her a set of reusable cloth napkins, and a placemat made of laminated cotton! We wash her napkins and wipe down her placemat as needed, and they go back in her lunchbox for the next day - she loves them and I love not throwing away all those paper towels! 


You can win your own set today - perfect for your child or for yourself! The laminated cotton placemat is bpa free and has a decorative serged edge. It should be wiped clean with a damp cloth and laid flat to dry. The set of five napkins (one for each day of the work week!) is made of cotton quilting fabric and is double sized and features top-stitching for a professional finish and look. 


To win, leave me a comment telling me your favorite handmade item to give as a gift! Please leave your email address in your comment to make sure I can contact you! Thanks for stopping by! Giveaway closes at 5pm PST May 25. I'll update this post with the winner by Sunday May 27!


***UPDATE** Brooke is the winner! Congrats Brooke! Thanks to everyone for stopping by!
If you didn't win, you can purchase your own set of cloth napkins in my etsy store. I plan on adding the placemats soon!

Giveaway Day!

Welcome to Giveaway Day! Hosted by Sew Mama Sew! each year, this event celebrates those of us who create! Anyone with a blog is welcome to join in, and give away an item for crafting (specifically related to sewing), or a handmade item. Today I'm giving away two items!


The first item is for that special little kiddo in your life. My daughter loves to cook in her kitchen and feed us and her babies her creations. She was always asking me for napkins and placemats for her little table, so I decided to make her some! And now you can win a set!


This is a set of four placemats and four napkins. They are sized small for baby doll and toddler use! :) The placemats measure 9x12" and the napkins are 4x8".  They are made of two layers of cotton quilting fabric and feature serged edges for durability! The fabric is an adorable vintage-look fabric from Debbie Mumm and features stuffed toy animals.

To win, please leave me a comment telling me your favorite handmade item to give to a child! Please leave your email address in your comment to make sure I can contact you! Thanks for stopping by! Giveaway closes at 5pm PST May 25. I'll update this post with the winner by Sunday May 27!


***UPDATED*** The winner is SandyandCosmo! Please email me your address and I'll send your gift out! Thanks to everyone for stopping by!


If you didn't win you can purchase your own set in my etsy store

*Please note, that the table, chairs, dolls and tea set are not included in the giveaway!*

Saturday, May 19, 2012

Blogger's Quilt Festival

I am excited that I not only finished one of my favorite quilts in time to take to quilt guild last night, but just in time for the Blogger's Quilt Festival!

Made in Remix

When I first saw the Made in Cherry quilt pattern (free!), I just loved it. I love stars, and hadn't made a star quilt yet, and loved this one giant star! I wanted to make it coordinate with the colors of our living room, and make it modern. When we added on last year we painted the new living room a pale grey. One of my favorite fabrics to include in a quilt is Kona Coal, so I wanted something that would coordinate with that. Hubby is not a big fan of floral prints, so something geometric would be ideal. And since I don't often get to the LQS with all three kids, a bundle of coordinating fabrics would be perfect! I love Ann Kelle's prints, and her Remix fabrics are so modern and fresh. I purchased two bundles on etsy, and started cutting!

Made in Remix closeup of star interior

I laid out my rows in advance, to try to eliminate having prints touch. Unfortunately, I didn't keep track of the top and bottom of my quilt after I had my rows joined, so when I added the star points I had some matching. Not a big deal though! (But a good excuse to finally create a design wall of some sort!)

Corner quilting

I quilted 1/4" on each side of the seam within the star. Then I copied Megan and quilted my lines within the solids 1/2" apart. I just eyeballed them, so they are not perfect, but I love the way it looks! I used white thread for the interior of the star and grey for within the solids. Quilting the straight lines took a while, but was actually pretty easy since I wasn't wrestling the entire quilt through the machine.

Between the points quilting

It took about an hour to quilt each solid section and a few hours for the interior of the star. One of the longest times it's taken me to quilt a quilt (but it is a pretty big quilt - finishing at 80"x80"). I did it all on my home machine!

Made in Remix back

For the backing I pulled some black/white/grey fabrics from my stash and pieced them together. I really like it!

I used an aqua fabric with tiny black scattered dots for the binding (from JoAnn's). I'm trying to branch out on my binding - I typically use a fabric from the front, or fabric that matches the backing or a neutral solid. I really like how the binding matches, but isn't a featured print. I also like how it highlights the aqua prints within the star and pulls it out a bit.

Love this quilt! Now if it would just cool off so I could use it! Probably will be waiting a while for that!