Monday, January 28, 2013

Modern Half-Square Triangle Quilt-a-Long Block 21

Welcome! If you are just joining us, information about materials can be found here, and here are the previous blocks: Block 1Block 2Block 3Block 4Block 5Block 6Block 7Block 8Block 9Block 10Block 11Block 12Block 13, Block 14Block 15Block 16Block 17Block 18Block 19Block 20.


Materials:
8 3.5" squares of Color A
8 3.5" squares of Color B

*note* these are the essential materials for each block, so you can cut several blocks worth of fabric at once to save time!

Create your blocks, following the same procedure as last week. If you need help making your blocks, please see this post. You should end up with 16 2.5" squares. Ready to lay out your block? Here we go!


ROW 1


ROW 2


ROW 3


ROW 4

After you have sewn your squares into rows, press your seams. I like to press odd numbered rows to the left, and even to the right. It helps to use a small piece of paper to number your rows. I like the tiny post-it notes. 

After pressing, you are ready to sew your rows together! Pin, if necessary, but I find that these short rows don't require pinning.


Press one final time, and voila! Another finished block! Only 51 to go! Pat yourself on the back! Remember to add your blocks to our flickr group!


Friday, January 25, 2013

Sampler Quilt

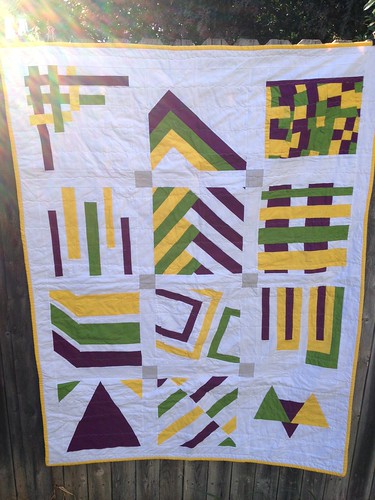
When I joined my local Modern Quilt Guild last spring, they were in the midst of working through the Sew Mama Sew Modern Block of the Month. I decided that I needed to join in and grabbed some Kona solids one day to use. (I didn't realize until I got home that they were sort of Mardi Gras colors - totally unintentional). I started doing the blocks in order, and quickly found some frustrations. I didn't like all the tiny cutting for each block - it was difficult to do from yardage of the fabric. Also, one of the first blocks is an improv block, and I have not had a lot of experience doing that. I also am a big lover of geometry, symmetry and clean lines - so this block made me twitch a bit!

I stalled out for a while, but was determined to finish (I can have 20 million knitting projects, but don't like lingering sewing projects - I'm strange).  I thought it would go well in my brother and sister-in-law's living room, and they like modern and vintage things.

sms sampler

I sashed the blocks with Kona White and used the leftover yardage of the gold and purple for the backing (I bought two yards of each color and I still have leftovers!) This was one I was glad to be finished with! I did enjoy some of the individual blocks and may make them again for different projects. Also, if I had really done one block a month, instead of four or five at a time, I might have enjoyed the process more!

Thursday, January 24, 2013

Quilted Key Fob Tutorial

I've seen lots of these handmade key fobs around, and thought they would make great gifts and great things to add to my etsy store. However, I knew I didn't want to use webbing for the backing, and thought I could make them 'quilted' with batting scraps and fabric. I couldn't find a good, comprehensive tutorial for exactly what I wanted to make, so I used what I knew would work, and came up with this! I hope this method helps out those of you who are interested in making your own!


Supplies: You will need fabric scraps, and batting scraps. Additionally, you will need the hardware for the key fob and needle nosed pliers. I ordered my hardware from Bree's Basement, and they shipped the next day and were here super quick. I will be ordering from her again!

First, cut your batting and fabric the size you want. I like to make a 10" and 7" length for my fobs - the 10" fits better around your wrist, and the 7" fits better in your pocket, if you are like me and always stick your keys there. If you order the 1" fobs, you will need to cut your fabric to 2.5" x the length you want (10", 7" or something else). I cut my batting to the same length, and to just shy of 2" wide.

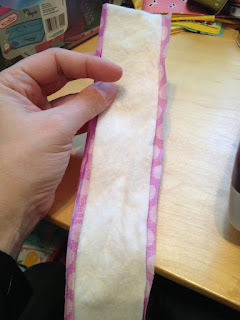
Next, you will need to iron down both long sides of your fabric about 1/4". *If you want to use labels, sew your label on before the next steps.* Your batting should fit comfortably in the middle of the fabric now (between the folds). If it does not, you can trim off a bit more.


Fold your fabric in half, with the ironed folds matching. You may want to pin at this step, to make the sewing easier. I hold it with one hand, and sew very slowly. Sew as close to the fold as you can - about 1/8" from the fold lines.


Continue by sewing on the other side (to match the edges), and add as many quilting lines as you need down the center of the key fob. I usually end up with four lines - two on each edge and two in the middle. I try to sew the middle lines about 1/4" away from the outside lines and from each other. 


Now you will attach the hardware. This is made much easier if you have an additional set of hands to help you hold everything.  If you can, wrap the ends of your pliers in duct tape - this will keep them from slipping off the hardware, and will keep them from scratching the hardware. Plus, duct tape is easily removable. 

Fold your length of fabric in half and match your ends. Trim any loose threads and apply fray-check to the ends. 


If you used a label, you may want it to be on the inside of the fob, so keep that in mind when positioning everything. Slide the ends of the fabric into the opening of the fob - I like to keep the little holes on the back of the fob. 


Pinch both sides of the hardware down, and then press firmly in the middle to tighten everything up. Voila, that's it! You're done! Now make a million more for teacher gifts and stocking stuffers!




Tuesday, January 22, 2013

The Cowl's the Thing

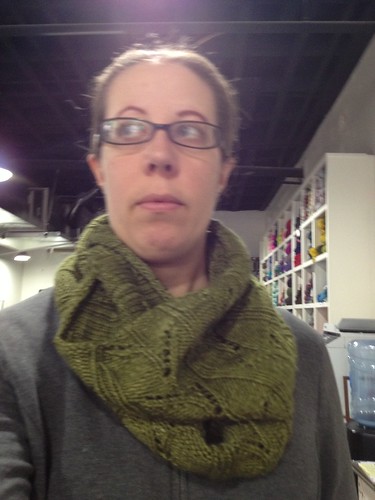
I have always loved scarves. I wear a scarf and sweater most of the winter in lieu of a coat (in all fairness, we usually don't need heavy coats here in Texas except for a few weeks). But the seduction of the Honey Cowl could be ignored no longer, and two skeins of Madelinetosh Tosh DK in Ruby Slippers came home with me one day.

honey cowl

I wish I had used a needle one size up to make it a bit more drapey, but I do like the size of it overall. It is very warm and toasty wrapped twice around my neck.


I then knit this for a class I taught this month - it is the Everett Cowl. I didn't enjoy the knitting of this (very long rows and very repetitive), but it came out so nicely after it was blocked. I'd almost consider knitting another for myself. It is a good length, and very pretty.

photo 2

Why do I make such funny faces when I take my own pictures?

Monday, January 21, 2013

Modern Half-Square Triangle Quilt-a-Long Block 20

Welcome! If you are just joining us, information about materials can be found here, and here are the previous blocks: Block 1Block 2Block 3Block 4Block 5Block 6Block 7Block 8Block 9Block 10Block 11Block 12Block 13, Block 14Block 15Block 16Block 17Block 18Block 19.


Materials:
8 3.5" squares of Color A
8 3.5" squares of Color B

*note* these are the essential materials for each block, so you can cut several blocks worth of fabric at once to save time!

Create your blocks, following the same procedure as last week. If you need help making your blocks, please see this post. You should end up with 16 2.5" squares. Ready to lay out your block? Here we go!


ROW 1


ROW 2


ROW 3


ROW 4

After you have sewn your squares into rows, press your seams. I like to press odd numbered rows to the left, and even to the right. It helps to use a small piece of paper to number your rows. I like the tiny post-it notes. 

After pressing, you are ready to sew your rows together! Pin, if necessary, but I find that these short rows don't require pinning.


Press one final time, and voila! Another finished block! Only 52 to go! Pat yourself on the back! Remember to add your blocks to our flickr group!


Wednesday, January 16, 2013

WIP Wednesday

I've finally had some time to spend with my sewing machine over the past few days-it has been so nice! I didn't realize how much I had missed sitting down to sew for more than a minute or two.
I have three quilts in process, and managed to finish up two of the tops so far this week-hoping to get the other one done later this week.
I'm also quilting a nearly queen size quilt this week too-would be so nice to get that done too!


Monday, January 14, 2013

Modern Half-Square Triangle Quilt-a-Long Block 19

Welcome! If you are just joining us, information about materials can be found here, and here are the previous blocks: Block 1Block 2Block 3Block 4Block 5Block 6Block 7Block 8Block 9Block 10Block 11Block 12Block 13, Block 14Block 15Block 16Block 17Block 18,


Materials:
8 3.5" squares of Color A
8 3.5" squares of Color B

*note* these are the essential materials for each block, so you can cut several blocks worth of fabric at once to save time!

Create your blocks, following the same procedure as last week. If you need help making your blocks, please see this post. You should end up with 16 2.5" squares. Ready to lay out your block? Here we go!


ROW 1


ROW 2


ROW 3


ROW 4

After you have sewn your squares into rows, press your seams. I like to press odd numbered rows to the left, and even to the right. It helps to use a small piece of paper to number your rows. I like the tiny post-it notes. 

After pressing, you are ready to sew your rows together! Pin, if necessary, but I find that these short rows don't require pinning.


Press one final time, and voila! Another finished block! Only 53 to go! Pat yourself on the back! Remember to add your blocks to our flickr group!


Wednesday, January 09, 2013

Grellow Garden Fence

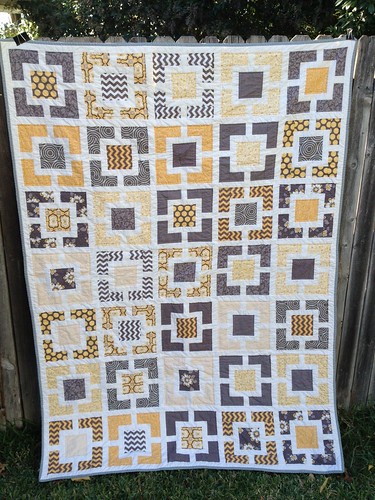
Several months ago I pinned the link to this tutorial. A few months later, while perusing my quilt board for inspiration, I noticed that my sister had commented "Make me this!" on that pin (I don't always pay attention to pin comments - I will now!). I had happened to have just ordered a grey and yellow fat quarter bundle, so I set to work cutting it up.

ems quilt

I used Kona Snow for the 'paths' and the sashing. There was a lot of sewing, pressing, sewing, pressing, etc. in this quilt, but I think it turned out great.

closeup ems

I quilted 1/4" inside the big and small squares. At first I was trying to turn the beast under my machine at each corner, but I decided to do rows/columns and back stitch at the beginning and end of blocks. I'm sure that's probably 'not correct', but it worked!

binding ems

For the backing and binding I used two prints that I purchased on separate trips to JoAnn's that coordinated perfectly! I was so excited that the looked so well together and with the quilt top.

She loves it, and I really love the way it turned out!

Monday, January 07, 2013

Modern Half-Square Triangle Quilt-a-Long Block 18

Welcome! If you are just joining us, information about materials can be found here, and here are the previous blocks: Block 1Block 2Block 3Block 4Block 5Block 6Block 7Block 8Block 9Block 10Block 11Block 12Block 13, Block 14Block 15Block 16Block 17.


Materials:
8 3.5" squares of Color A
8 3.5" squares of Color B

*note* these are the essential materials for each block, so you can cut several blocks worth of fabric at once to save time!

Create your blocks, following the same procedure as last week. If you need help making your blocks, please see this post. You should end up with 16 2.5" squares. Ready to lay out your block? Here we go!


ROW 1


ROW 2


ROW 3


ROW 4

After you have sewn your squares into rows, press your seams. I like to press odd numbered rows to the left, and even to the right. It helps to use a small piece of paper to number your rows. I like the tiny post-it notes. 

After pressing, you are ready to sew your rows together! Pin, if necessary, but I find that these short rows don't require pinning.


Press one final time, and voila! Another finished block! Only 54 to go! Pat yourself on the back! Remember to add your blocks to our flickr group!